Difference between revisions of "Standalone Executables on Windows"
Yvonne.milne (Talk | contribs) (→Splashscreen) |
Yvonne.milne (Talk | contribs) (→Scripting Language) |
||
| Line 53: | Line 53: | ||
=Building Standalone Executables= | =Building Standalone Executables= | ||
==Scripting Language== | ==Scripting Language== | ||
| − | Select the scripting language in the [[App_Settings#Delegates|App Settings]]: | + | The example_timeclock App includes sample custom coded Forms in Visual Foxpro, Python and JavaScript. |
| + | |||
| + | Select the scripting language in the [[App_Settings#Delegates|App Settings]] to build for the selected language: | ||
[[{{ns:file}}:l95_standalone_scrptinglang.png|left|link={{filepath:l95_standalone_scrptinglang.png}}|Scripting Language]] | [[{{ns:file}}:l95_standalone_scrptinglang.png|left|link={{filepath:l95_standalone_scrptinglang.png}}|Scripting Language]] | ||
Revision as of 12:17, 9 April 2024
Contents
See Also
Deployment, Lianja Package Manager, Packaging Lianja Desktop Apps for Windows
Overview
The range of Apps that can be built as standalone executables on Windows and the ease and speed of building and deploying the executables is significantly extended from Lianja 9.5.
- Any Lianja App can be packaged as a standalone desktop App for Windows (previously just Apps based on a custom-coded or autogenerated Form as below).
- Build and run a standalone App with one click or customize the build with the following options:
- Autogenerated and/or defined library dependencies
- Create a zip or self-extracting exe
- Specify database(s) to include
- Specify mandatory login with optionally customized login page
- Build in release mode or debug mode, the latter displaying a command window and output panel alongside the App
Pre 9.5
From Lianja 7.0 developers can build standalone executables on Windows.
These executables can only be built for Apps that have been hand-coded in LianjaScript, Python, JavaScript, TypeScript or Babel using the Lianja UI Framework.
Alternatively, you can also visually build forms in the App Builder that use any of the following scripting languages as the Lianja UI framework is scripting language independent across Desktop, Web and Mobile Apps.
- LianjaScript/VFP
- Python
- JavaScript
- Typescript
Forms are based on a tabview section which contains canvas, grid or webview based sections in its tabs. See the blog article Working with forms in Lianja for further details.
This functionality is primarily for building small GUI Apps, not for business Apps running under the Lianja App Center with Users and Roles.
Sample App: example_timeclock
The example_timeclock sample App is included in the Lianja App Builder distribution from v7.0 in the 'General' category.
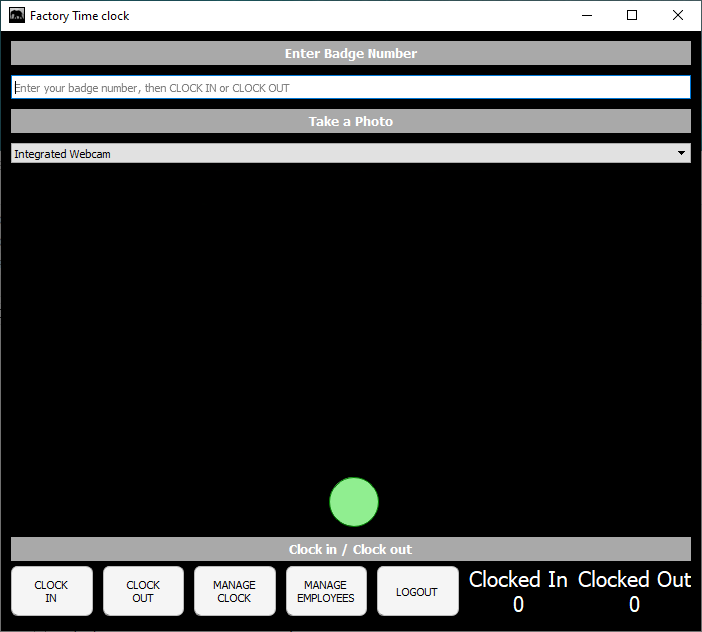
This app uses the Camera UI Framework class and is a small App to handle clocking in and out of employees in a company.
It has been further enhanced from v9.5 and demonstrates a custom coded (Visual Foxpro/Python/JavaScript) Form based standalone App.
Sample App: example_webapp1
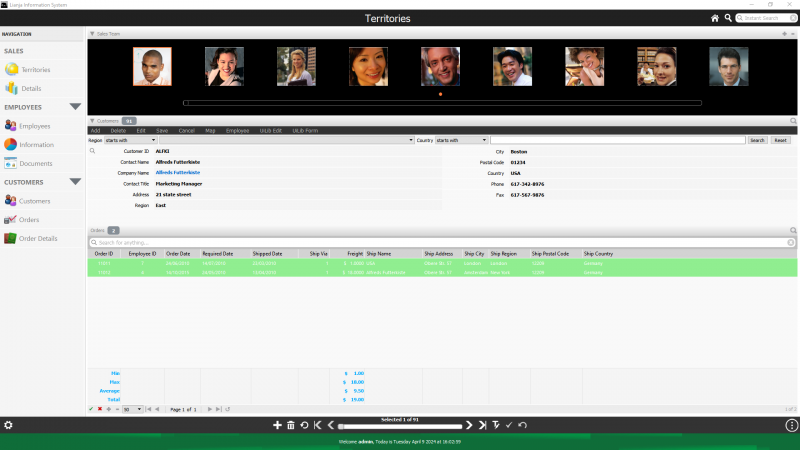
The example_webapp1 sample App ('Tablet Demo1'), included in the Lianja App Builder distribution, has been updated in v9.5 to demonstrate how a non Form based App - and one that also runs on web/mobile - can be built as a standalone desktop App for Windows.
Note the following updates:
- App Settings -> Standalone Options
- App Settings -> UI Presentation Rules
- app.conf file (Category: Other files)
- splashscreen.png (Category: Image files)
Building Standalone Executables
Scripting Language
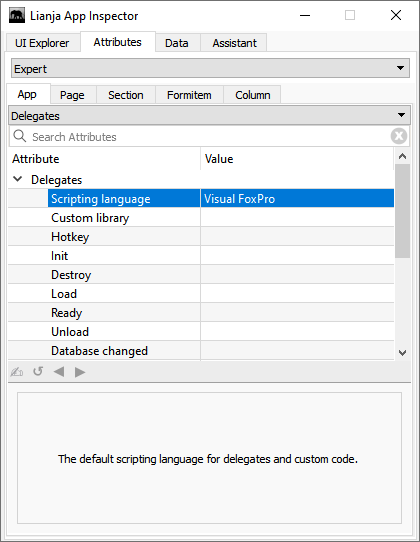
The example_timeclock App includes sample custom coded Forms in Visual Foxpro, Python and JavaScript.
Select the scripting language in the App Settings to build for the selected language:
Standalone
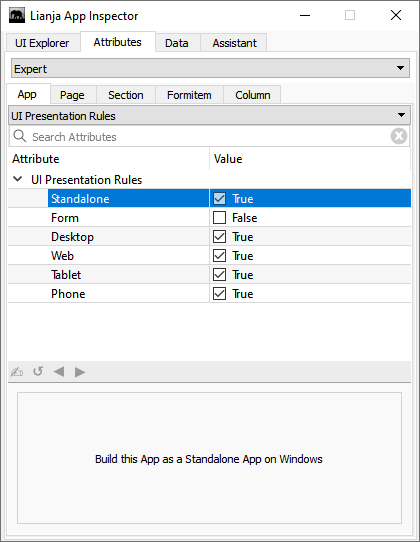
Check Standalone in the UI Presentation Rules App Settings.
Standalone Options
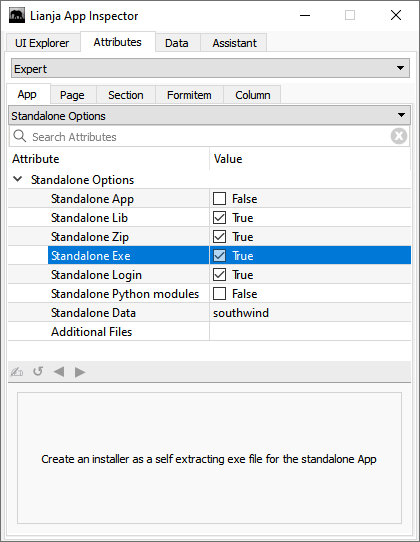
Check the Standalone App setting to generate a complete standalone App for any Windows desktop App, or customize the build for your standalone Form based App using the Standalone Options:
Standalone App
From v9.5, checking the Standalone App setting (in Standalone Options shown in the screenshot above) will generate a complete standalone App. This can be used for all Windows desktop Apps, not just those based on a custom coded or autogenerated Form.
Standalone Lib
From v9.5, checking the Standalone Lib setting (in Standalone Options shown in the screenshot above) will include library files. When the standalone app is run the library directory is set to the standalone App library directory.
The following text files are used to specify which library files should be included:
dependencies.txt
This is generated automatically when the App is built if the App contains any WebView Based Sections.
For example, the 'Tabbed Form' (form2) App, includes the following sections:
and its dependencies.txt is generated as:
@articleview
@catalogview
@commentsview
@carouselview
@calendar
The '@sectiontype' format references the corresponding 'sectiontype-dependencies.txt' file in the library containing the names of any required files and directories, e.g. catalogview-dependencies.txt:
bootstrap-3.3.4
jquery-1.10.2
catalogview.*
includes.txt
The 'includes.txt' file is used to specify any additional files that should be included.
As in 'dependencies.txt' these can be:
- folder names
- individual file names
- wildcards (like catalogview.*)
- @filename to include the contents of '@filename-dependencies.txt'
Standalone Zip
From v9.5, checking the Standalone Zip setting (in Standalone Options shown in the screenshot above) will create a zip file for the standalone App.
Standalone Exe
From v9.5, checking the Standalone Exe setting (in Standalone Options shown in the screenshot above) will create an installer as a self-extracting exe file for the standalone App. This can be unzipped / installed on a target machine.
Standalone Login
From v9.5, checking the Standalone Login setting (in Standalone Options shown in the screenshot above) will include the files required for enabling login.
Form Based Apps
To require login for access to the App, set the Form.requireslogin property to true:
local oform = createObject("Form")
oform.requireslogin = 1
The login page can optionally be customized using the Form.parameters property, e.g.:
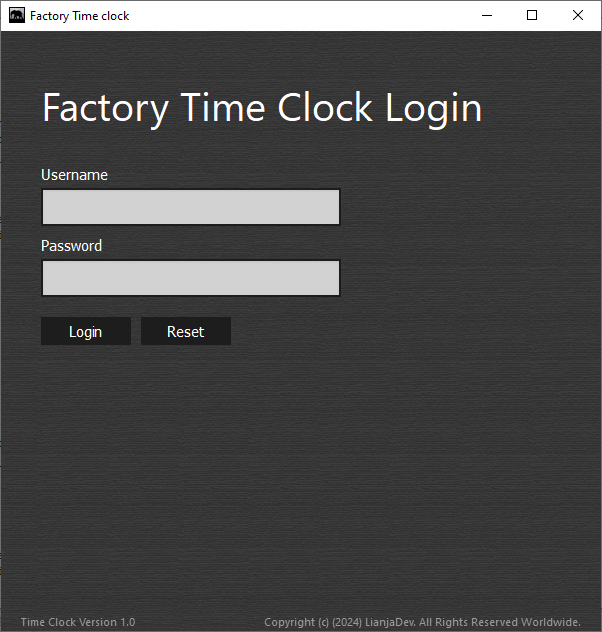
oform.parameters = "login.caption=Factory Time Clock;";
+ "login._background=darkred;";
+ "login.backgroundimage=img/wallpapers/background.png;";
+ "login.version=Time Clock Version 1.0;";
+ "login.copyright=Copyright (c) (2024) LianjaDev. All Rights Reserved Worldwide."
Non Form Based Apps
Login will be required if the Enable guest access App Setting is false.
Specify login page customizations in the app.conf file, e.g. from example_webapp1:
login.title={lianja.apptitle}
login.headervisible=true
login.headericon=lib:/icons/ipad4.png
login.headercaption=Welcome to the {lianja.apptitle}
login.caption={lianja.apptitle}
login.background=#333
login.backgroundimage=app:/login.jpg
login.version={lianja.apptitle} Version {lianja.appversion}
login.copyright=Copyright (c) (2024) {lianja.appauthor}. All Rights Reserved Worldwide.
Note that you can use {macros} and lib:/ and app:/ special file prefixes in the app.conf file.
Standalone Python modules
From v9.5, checking the Standalone Python modules setting (in Standalone Options shown in the screenshot above) indicates that the standalone App requires Python modules in the App.
Standalone Data
From v9.5, specifying a comma separated list of databases in the Standalone Data setting (in Standalone Options shown in the screenshot above) will copy the databases into the standalone App directory. When the standalone app is run the data directory is set to the standalone App data directory.
Additional Files
From v9.5, specifying a comma separated list of additional files in the Additional Files setting (in Standalone Options shown in the screenshot above) will copy them into the standalone App directory structure. Wildcards and the lib:/ special prefix may be used.
Setup
From v9.5, if the file setup.prg (or setup.py or setup.js) is contained within the App it is executed before the standalone App is run. You can check to see if the App is running standalone using Lianja.standalone and check the file path using Lianja.standalonefilepath.
You would typically do nothing in setup if the App is not running standalone.
// this is called when the app runs to setup databases, tables etc.
if not Lianja.standalone
	return
endif

set debugout on
debugout "running setup.prg"
debugout "filepath: "+Lianja.standalonefilepath

if not databaseExists("factory")
	debugout "database factory does not exist"
	create database factory
	try
		open database factory
		create table employees;
		 (badgeno char(30),;
		  firstname char(30),;
		  lastname char(30),;
		  photo blob)
		insert into employees (badgeno, firstname, lastname);
		 values ("A1234", "John", "Doe")
		create table timeclock;
		 (badgeno char(30),;
		  clockin datetime,;
		  clockout datetime,;
		  clockinphoto blob,;
		  clockoutphoto blob)
	catch
		debugout "An error occurred"
	endtry
endif

close database

debugout "setup completed successfully"
Script
Then write the 'main' script with the same name as the App. In the case of the sample example_timeclock App, this is example_timeclock.prg or example_timeclock.js or example_timeclock.py (see code below). You can switch the 'Scripting language' in the App Settings to test each one.
LianjaScript/Visual FoxPro
Note the READ EVENTS at the end of the code which is needed for a standalone App.
example_timeclock.prg
local oform = createObject("Form")
oform.resize(600, 600)
oform.closable = 1
oform.caption = "Time clock - LianjaScript"
oform.minwidth = 600
oform.minheight = 600

oform.addObject("ocont", "container")
ocont.margin = 10
ocont.autosize = 1
ocont.layout = "V"
ocont.backcolor = "black"

ocont.addObject("obadgenolab", "label")
obadgenolab.fixedheight = 24
obadgenolab.autowidth = 1
obadgenolab.alignment = "center"
obadgenolab.caption = "Enter Badge Number"
obadgenolab.backcolor = "darkgray"
obadgenolab.forecolor = "white"
obadgenolab.fontbold = 1
obadgenolab.fontsize = 10

ocont.addspacing(10)
ocont.addObject("obadgeno", "textbox")
obadgeno.fixedheight = 24
obadgeno.autowidth = 1
obadgeno.placeholder = "Enter your badge number, Take a Photo then CLOCK IN or CLOCK OUT"

ocont.addspacing(10)
ocont.addObject("obadgenolab2", "label")
obadgenolab2.fixedheight = 24
obadgenolab2.autowidth = 1
obadgenolab2.alignment = "center"
obadgenolab2.caption = "Take a Photo"
obadgenolab2.backcolor = "darkgray"
obadgenolab2.forecolor = "white"
obadgenolab2.fontbold = 1
obadgenolab2.fontsize = 10

ocont.addspacing(10)
ocont.addObject("ocamera", "camera")
ocamera.autowidth = 1
ocamera.autoheight = 1
ocamera.backcolor = "black"

ocont.addspacing(10)
ocont.addObject("obadgenolab3", "label")
obadgenolab3.fixedheight = 24
obadgenolab3.autowidth = 1
obadgenolab3.alignment = "center"
obadgenolab3.caption = "Clock in / Clock out"
obadgenolab3.backcolor = "darkgray"
obadgenolab3.forecolor = "white"
obadgenolab3.fontbold = 1
obadgenolab3.fontsize = 10

ocont.addObject("ocont2", "container")
ocont2.layout = "H"
ocont2.fixedheight = 60
ocont2.backcolor = "black"
ocont2.spacing = 10

ocont2.addObject("obtn1", "commandbutton")
obtn1.resize(60, 50)
obtn1.flat = 1
obtn1.fixedheight = 50
obtn1.caption = "CLOCK IN"
obtn1.stylesheet = "btn"
ocont2.addObject("obtn2", "commandbutton")
obtn2.flat = 1
obtn2.resize(60, 50)
obtn2.fixedheight = 50
obtn2.stylesheet = "btn"
obtn2.caption = "CLOCK OUT"

// event handlers
proc clockin()
	ocamera.takePhoto()
	thisform.showSuccessMessage("You clocked in on " + dtoc(date()) + " at " + ampm())
endproc

proc clockout()
	ocamera.takePhoto()
	thisform.showSuccessMessage("You clocked out on " + dtoc(date()) + " at " + ampm())
endproc

obtn1.click = clockin
obtn2.click = clockout

// modal form
oform.show()

// must put read events at the bottom so the window stays open until closed by user
read events
Python
- Check that pip is the latest version. From a Windows Command Prompt (replace drive: with the drive for your Lianja App Builder installation):
cd drive:\lianja\bin
python -m pip install --upgrade pip --no-warn-script-location
- In the Lianja App Builder Console Workspace, create the python3 directory to contain the modules local to the App (this has already been created for the example_timeclock App):
mkdir python3
- Install local Python modules (pip can be run from the Lianja/VFP tab in the Console Workspace Command Window), e.g. numpy:
pip install --target=drive:\lianja\apps\example_timeclock\python3\ numpy
Note: the local installation of the Python modules causes these modules to be included when the standalone executable is generated. During App development, any required modules also need to be installed in the default location for Lianja, i.e. without a --target specified.
To check modules installed in the default location:
pip list
To check the Python path (from the Python tab):
import sys
print(sys.path)
example_timeclock.py
import sys
import types
from datetime import datetime
import Lianja

class myCommandbutton(Lianja.Commandbutton):
	pass

oform = createObject("form")
oform.resize(600, 600)
oform.closable = 1
oform.caption = "Time clock - Python"
oform.minwidth = 600
oform.minheight = 600

oform.addObject("ocont", "container")
ocont.margin = 10
ocont.autosize = 1
ocont.layout = "V"
ocont.backcolor = "black"

ocont.addObject("obadgenolab", "label")
obadgenolab.fixedheight = 24
obadgenolab.autowidth = 1
obadgenolab.alignment = "center"
obadgenolab.caption = "Enter Badge Number"
obadgenolab.backcolor = "darkgray"
obadgenolab.forecolor = "white"
obadgenolab.fontbold = 1
obadgenolab.fontsize = 10

ocont.addspacing(10)
ocont.addObject("obadgeno", "textbox")
obadgeno.fixedheight = 24
obadgeno.autowidth = 1
obadgeno.placeholder = "Enter your badge number, Take a Photo then CLOCK IN or CLOCK OUT"

ocont.addspacing(10)
ocont.addObject("obadgenolab2", "label")
obadgenolab2.fixedheight = 24
obadgenolab2.autowidth = 1
obadgenolab2.alignment = "center"
obadgenolab2.caption = "Take a Photo"
obadgenolab2.backcolor = "darkgray"
obadgenolab2.forecolor = "white"
obadgenolab2.fontbold = 1
obadgenolab2.fontsize = 10

ocont.addspacing(10)
ocont.addObject("ocamera", "camera")
ocamera.autowidth = 1
ocamera.autoheight = 1
ocamera.backcolor = "black"

ocont.addspacing(10)
ocont.addObject("obadgenolab3", "label")
obadgenolab3.fixedheight = 24
obadgenolab3.autowidth = 1
obadgenolab3.alignment = "center"
obadgenolab3.caption = "Clock in / Clock out"
obadgenolab3.backcolor = "darkgray"
obadgenolab3.forecolor = "white"
obadgenolab3.fontbold = 1
obadgenolab3.fontsize = 10

ocont.addObject("ocont2", "container")
ocont2.layout = "H"
ocont2.fixedheight = 60
ocont2.backcolor = "black"
ocont2.spacing = 10

ocont2.addObject("obtn1", "myCommandbutton")
obtn1.resize(60, 50)
obtn1.flat = 1
obtn1.fixedheight = 50
obtn1.caption = "CLOCK IN"
obtn1.stylesheet = "btn"
ocont2.addObject("obtn2", "myCommandbutton")
obtn2.flat = 1
obtn2.resize(60, 50)
obtn2.fixedheight = 50
obtn2.stylesheet = "btn"
obtn2.caption = "CLOCK OUT"

# event handlers
def clockin(self):
	ocamera.takePhoto()
	now = datetime.now()
	oform.showSuccessMessage("You clocked in at " + now.strftime("%m/%d/%Y %I:%M:%S %p"))

def clockout(self):
	ocamera.takePhoto()
	now = datetime.now()
	oform.showSuccessMessage("You clocked out at " + now.strftime("%m/%d/%Y %I:%M:%S %p"))

# We can dynamically bind events to custom classes in Lianja/Python
bindEvent(obtn1, clockin, "click")
bindEvent(obtn2, clockout, "click")

# modal form
oform.show()
Lianja.readEvents()
JavaScript
example_timeclock.js
var oform = createObject("Form");
oform.resize(600, 600);
oform.closable = 1;
oform.caption = "Time clock - JavaScript";
oform.minwidth = 600;
oform.minheight = 600;
oform.deleteonclose = 1;

oform.addobject("ocont", "container");
ocont.margin = 10;
ocont.autosize = 1;
ocont.layout = "V";
ocont.backcolor = "black";

ocont.addObject("obadgenolab", "label");
obadgenolab.fixedheight = 24;
obadgenolab.autowidth = 1;
obadgenolab.alignment = "center";
obadgenolab.caption = "Enter Badge Number";
obadgenolab.backcolor = "darkgray";
obadgenolab.forecolor = "white";
obadgenolab.fontbold = 1;
obadgenolab.fontsize = 10;

ocont.addspacing(10);
ocont.addObject("obadgeno", "textbox");
obadgeno.fixedheight = 24;
obadgeno.autowidth = 1;
obadgeno.placeholder = "Enter your badge number, Take a Photo then CLOCK IN or CLOCK OUT";

ocont.addspacing(10);
ocont.addObject("obadgenolab2", "label");
obadgenolab2.fixedheight = 24;
obadgenolab2.autowidth = 1;
obadgenolab2.alignment = "center";
obadgenolab2.caption = "Take a Photo";
obadgenolab2.backcolor = "darkgray";
obadgenolab2.forecolor = "white";
obadgenolab2.fontbold = 1;
obadgenolab2.fontsize = 10;

ocont.addspacing(10);
ocont.addObject("ocamera", "camera");
ocamera.autowidth = 1;
ocamera.autoheight = 1;
ocamera.backcolor = "black";

ocont.addspacing(10);
ocont.addObject("obadgenolab3", "label");
obadgenolab3.fixedheight = 24;
obadgenolab3.autowidth = 1;
obadgenolab3.alignment = "center";
obadgenolab3.caption = "Clock in / Clock out";
obadgenolab3.backcolor = "darkgray";
obadgenolab3.forecolor = "white";
obadgenolab3.fontbold = 1;
obadgenolab3.fontsize = 10;

ocont.addObject("ocont2", "container");
ocont2.layout = "H";
ocont2.fixedheight = 60;
ocont2.backcolor = "black";
ocont2.spacing = 10;

ocont2.addObject("obtn1", "commandbutton");
obtn1.resize(60, 50);
obtn1.flat = 1;
obtn1.fixedheight = 50;
obtn1.caption = "CLOCK IN";
obtn1.stylesheet = "btn";
ocont2.addObject("obtn2", "commandbutton");
obtn2.flat = 1;
obtn2.resize(60, 50);
obtn2.fixedheight = 50;
obtn2.stylesheet = "btn";
obtn2.caption = "CLOCK OUT";

// event handlers
function clockin()
{
	ocamera.takePhoto()
	oform.showSuccessMessage("You clocked in on " + new Date().toLocaleString())
};

function clockout()
{
	ocamera.takePhoto();
	oform.showSuccessMessage("You clocked out on " + new Date().toLocaleString())
};

obtn1.click = clockin;
obtn2.click = clockout;

// modal form
oform.show();

// must put read events at the bottom so the window stays open until closed by user
read_events();
Splashscreen
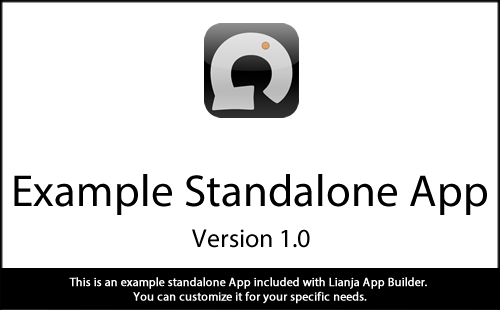
If your App includes an image file named splashscreen.png, it will be displayed as a splashscreen before the App loads.
Building and Testing Standalone Executables
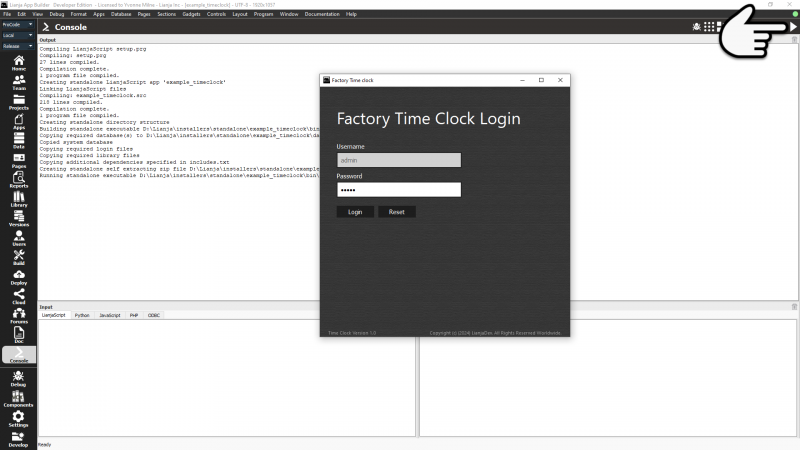
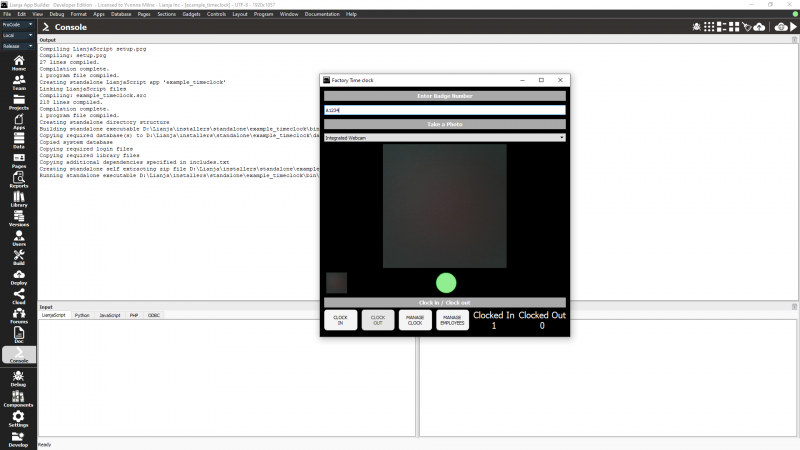
To build and test, switch to the Console workspace and click the 'Desktop App View' button in the Headerbar.
The Output window will show the compilation and build operations.
Here showing the login page:
and after login and entering a badge number:
To build and test the other scripts in the example_timeclock App - LianjaScript (.prg), Python (.py) and JavaScript (.js) are available - just select the required scripting language in the App Settings and click the 'Desktop App View' button again.
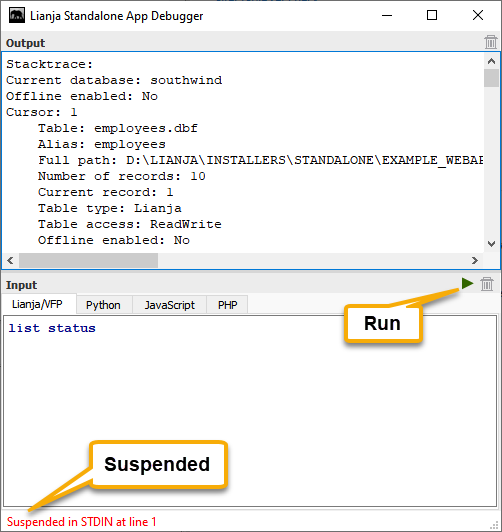
Lianja Standalone App Debugger
From v9.5 standalone Apps can be debugged at runtime.
Starting the Debugger
For Form based Apps, start the debugger using the form.debug() method in the code.
Non Form based Apps automatically show the debugger when built in Debug mode. The Modebar Selector can be used to toggle between Release and Debug mode.
Suspend
For Form based Apps, suspend execution using the form.suspend() method.
For non Form based Apps, call the Lianja.suspend() method in your code.
Input Panel
Type commands in the 'Input' panel, e.g.
list status
Output Panel
View the stack trace and command output in the 'Output' panel.
The set debugout and debugout commands can also be used to display 'debugout' text in the 'Output' panel. See the setup.prg above for an example of this.
Resume
Click the 'Run' button in the debugger to resume execution.
Alternatively, call the Lianja.resume() method.
Deploying Standalone Executables
When building a standalone executable with LianjaScript, all the .prg files in the App directory are linked together into a .src file and this is compiled.
The resulting object file is bound onto the end the Lianja runtime executable and the authenticode code signing is adjusted so as to not be affected by the application payload.
All of the supporting libraries are included in the standalone application directory.
If your application is built in Python, there is a python3 directory included which contains the python modules you have installed with pip.
Pre-9.5 Deployment
To deploy, install the whole standalone application directory, e.g for the example_timeclock App the directory is:drive:\lianja\installers\standalone\example_timeclock
and it has a single bin sub-directory containing the executable and required libraries:
drive:\lianja\installers\standalone\example_timeclock\bin
To run, the executable is:
drive:\lianja\installers\standalone\example_timeclock\bin\example_timeclock.exe
Note: In v7.0, the exe and required libraries are located in the application directory itself, e.g. example_timeclock (this has been corrected in v7.1). These need to be placed in a bin directory, either by renaming the directory to bin or by creating a bin sub-directory and copying all the other files into the new sub-directory.
Post-9.5 Deployment
From v9.5 you can also choose to deploy your App in the following ways:
- Self-extracting exe - set the Standalone Exe or Standalone_App App setting to true
- Zip - set the Standalone Zip App setting to true
