Contextual Help
Select the "Pages" workspace.
Click the "Help Editor" icon in the HeaderBar at the top.
Create or edit help topics and their content in the HTML editing panel.
Associate contextual help with a UI Element by editing the "Help topic" in its "Attributes" Tab.
See Also
Advanced Canvas Control Attributes, Advanced Canvas Control Custom Delegates, Autosuggestions, Custom Delegates, Data Mapping, Field Attributes, Section Attributes, SHOWHELP()
Overview
Lianja provides a number of ways in which you can display help information for users in your desktop Apps:
- Help table
- Tooltips
- Info tips
- Context Menu
Help table

A help table can be associated with one or more Apps. When a user clicks the Help icon in the section header, the HTML help topic associated with that section is displayed in a popup dialog.
Note: The help dialog can also be displayed using the SHOWHELP() function or the Lianja.showHelp() method.

The Help Editor is used to create help table content. It is accessed from its headerbar toolbutton.
If your App does not have a currently associated help table, you will be prompted to create it. If you click 'Yes', the table will be created automatically and added to the currently open database.

The help table name - by default this is the name of your App followed by '_help' - will be automatically added to your App Settings.
If you want to use an existing help table instead of creating a new one, just specify its name in the Help table attribute in the App Settings.

In the Help Editor, click the 'Add' button in the 'Help topics' panel and type in a unique help topic name.

Then, in the 'Help text' HTML editor, type the help contents to be displayed.

Now open the Section Attributes dialog and in the Help topic attribute, specify the help topic name you created in the Help Editor.
Remember to check (True) the Show help icon attribute so that the help icon will be displayed in the section header.

Help topics can also be associated with individual Form Section Fields and Canvas Section Advanced Controls. As with the section, enter the help topic name in the Help topic attribute.
The help dialog will be displayed when the F1 key while editing the control.
Note: Prior to Lianja v6.0, Help tables are supported on the Desktop client only.
Tooltips

When editing Form Section Fields or Canvas Section Advanced Controls, the Tooltip is displayed when the mouse hovers in the control.

The text to be displayed is specified in the Tooltip attribute.
Note: the text can contain HTML formatting.
Note: Tooltips are supported on the Desktop client only.
You can also specify "Placeholder text" which is displayed inside a UI TextBox when it is blank.
Info tips

Info tips also use the text from the Tooltip attribute.
Info tips differ from tooltips in that they are more prominently displayed and that they pop up immediately as you move between controls.
The display of info tips is toggled by the section header info tips icon.
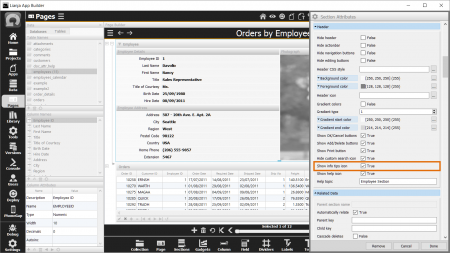
To display the info tips icon in the section header, the Show info tips icon section attribute must be checked (True).
Note: Info tips are supported on the Desktop client only.
Context Menu
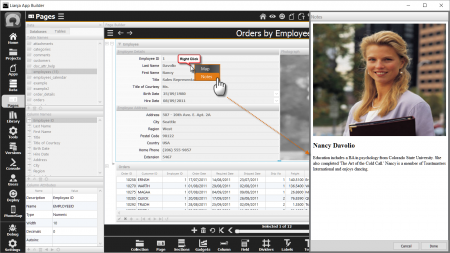
When editing Form Section Fields or Canvas Section Advanced Controls, right-clicking displays the Context Menu.
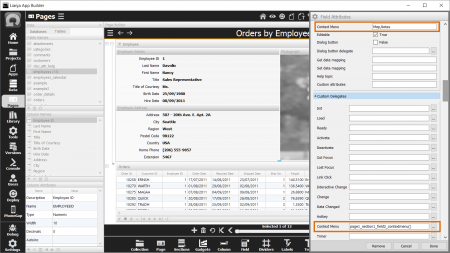
The menu is specified in the Context Menu attribute as a comma-separated list of menu items.
When a menu item is clicked, the item name is passed to the Context Menu custom delegate as a parameter.
In the example shown in the screenshots above, the Context Menu attribute is:
Map,Notes
and the Context Menu custom delegate is:
page1_section1_field2_contextmenu()
with the following JavaScript code:
////////////////////////////////////////////////////////////////
// Event delegate for 'contextmenu' event
function page1_section1_field2_contextmenu(arg)
{
	if (arg == "Map")
	{
		Lianja.showDialog("Map", "lib:/showdialog_map.rsp?address=\
		        {employees.address}+{employees.city}+{employees.country}", 500, 500, false, false);
	}
	else if (arg == "Notes")
	{
		Lianja.showDialogPanel("Notes", "lib:/showdialogpanel_employee.rsp?employeeid\
		        ={employees.employeeid}", 500);
	}
};
Note the use of {macros} which are substituted at runtime.
or Lianja/VFP code:
////////////////////////////////////////////////////////////////
// Event delegate for 'contextmenu' event
proc page1_section1_field2_contextmenu(arg)
        Lianja.writeLog("hello")
	do case
	case arg = "Map"
		Lianja.showDialog("Map", "lib:/showdialog_map.rsp?address={employees.address}+;
		{employees.city}+{employees.country}", 500, 500, false, false)
	case arg = "Notes"
		Lianja.showDialogPanel("Notes", "lib:/showdialogpanel_employee.rsp?employeeid=;
		{employees.employeeid}", 500)
	endcase
endproc
Note: Context menus are supported on the Desktop client only.