Difference between revisions of "Packaging Lianja Desktop Apps for Windows"
Yvonne.milne (Talk | contribs) |
Yvonne.milne (Talk | contribs) |
||
| Line 80: | Line 80: | ||
SectionEnd | SectionEnd | ||
;</pre> | ;</pre> | ||
| + | |||
| + | |||
| + | The /r recursively includes files, the /x excludes files matching the specified skeleton. | ||
===Step 3=== | ===Step 3=== | ||
Revision as of 10:14, 4 November 2015
Under Construction
Contents
Publish and Deploy your Apps
- Publish your Apps by checking the Published attribute in Settings
- Deploy your Apps and databases. If your Apps use any library, page library or extension files, deploy these too. Note that if you add your files into a Project, you can deploy them all just by deploying the Project.
- If you have created or modified users and roles, deploy the system database too.
Test your Apps in the Lianja App Center
Make sure your Apps are running the way you want by testing them from the Lianja App Center on your development machine.
Test any command line switches you want to use.
- Do you want your App to run from the Lianja App Center home page or do you want your App to start automatically?
- Do you want to run a script / program instead of opening an App?
- Do you want to specify username/password or any display options?
Lianja App Center for redistribution
Do you want to include the Lianja App Center (desktop runtime client) in your installer? If you do:
- Download the distribution from the Lianja web site.
- Put the distribution file in your \lianja\redist folder.
New Installer
The Lianja App Builder includes the NSIS Installer Builder and a template that can be easily customized.
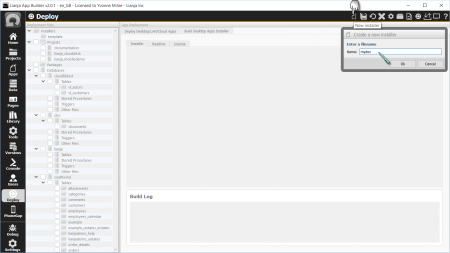
In the Deploy workspace, click the 'New installer' button and enter a name for your installer
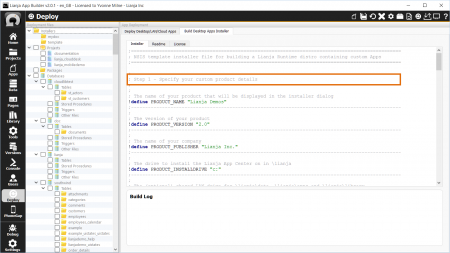
Step 1
Edit the installer template for your files. Look for the 'Step 1', 'Step 2' ... in the template text.
Edit the product name, version, company, and drive if required.
If you do not want to include the Lianja App Center desktop runtime client in your installer, remove the section that does this, as shown below.
;================================================================================================
; The Lianja App Center will be installed quietly if it is not already installed
;================================================================================================
Section -LIANJAAPPCENTER
  SetOutPath "$INSTDIR"
  File "${LIANJA_INSTALLDIR}\installers\${LIANJA_INSTALLERNAME}\readme.txt"
  File "${LIANJA_INSTALLDIR}\redist\${LIANJA_APPCENTER_DISTRIBUTION}"
  IfFileExists "$INSTDIR\bin\lianjaruntime.exe" DontInstallAppCenter 0
    ExecWait '"$INSTDIR\${LIANJA_APPCENTER_DISTRIBUTION}" --mode unattended --unattendedmodeui \
      minimal --prefix ${PRODUCT_INSTALLDRIVE}\lianja --sharedprefix ${PRODUCT_SHAREDINSTALLDRIVE}'
  DontInstallAppCenter:
SectionEnd
;
If you do want the Lianja App Center desktop runtime client included, remember to download the distribution file and put it in the \lianja\redist folder.
Step 2
Change the databases section so it has your databases. Keep the references to the system database if you have created or modified users and roles. Remove the references to the southwind sample database if it is not required.
Here I have specified the databases 'mydatabase1' and 'mydatabase2'.
;================================================================================================
; Step 2 - Specify the database(s) (if any) that you want to be installed
;          on the users desktop machine
;================================================================================================
Section -DATAFILES
  SetOverwrite ifnewer
  SetOutPath "${PRODUCT_SHAREDINSTALLDRIVE}\lianja\cloudserver\tenants\public\data\system"
  File /r /x *.bak "${LIANJA_INSTALLDIR}\data\system\*.*"
  SetOutPath "${PRODUCT_SHAREDINSTALLDRIVE}\lianja\cloudserver\tenants\public\data\mydatabase1"
  File /r /x *.bak "${LIANJA_INSTALLDIR}\data\mydatabase1\*.*"
  SetOutPath "${PRODUCT_SHAREDINSTALLDRIVE}\lianja\cloudserver\tenants\public\data\mydatabase2"
  File /r /x *.bak "${LIANJA_INSTALLDIR}\data\mydatabase2\*.*"
SectionEnd
;
The /r recursively includes files, the /x excludes files matching the specified skeleton.
Step 3
Change the Apps section so it just has your Apps.
Here I have specified the Apps 'tut_carousel', 'tut_docview' and 'tut_gallery'.
;================================================================================================
; Step 3 - Specify one or more Apps that you want to be installed
;          on the users desktop machine. Notice the use of /r to
;          recursively include files from the App directory.
;================================================================================================
Section -APPFILES
  SetOverwrite ifnewer
  SetOutPath "${PRODUCT_SHAREDINSTALLDRIVE}\lianja\cloudserver\tenants\public\apps\tut_carousel"
  File /r /x *.prg /x *.bak /x *.scp /x *.vcp /x *backups* "${LIANJA_INSTALLDIR}\apps\tut_carousel\*.*"
  SetOutPath "${PRODUCT_SHAREDINSTALLDRIVE}\lianja\cloudserver\tenants\public\apps\tut_docview"
  File /r /x *.prg /x *.bak /x *.scp /x *.vcp /x *backups* "${LIANJA_INSTALLDIR}\apps\tut_docview\*.*"
  SetOutPath "${PRODUCT_SHAREDINSTALLDRIVE}\lianja\cloudserver\tenants\public\apps\tut_gallery"
  File /r /x *.prg /x *.bak /x *.scp /x *.vcp /x *backups* "${LIANJA_INSTALLDIR}\apps\tut_gallery\*.*"
SectionEnd
;
Step 4
Add in the names of any library files used by your Apps.
Step 5
Add in the names of any page library files used by your Apps.
Step 6
Add in the names of any extension files used by your Apps.
Readme
Edit the readme.txt file in the Readme tab.
License
Edit the license.txt file in the License tab.
Build Installer
Click the Build Installer button to build your installer.
The Build Log will display the progress of the build and tell you when it is complete.
A sub-folder is created under \lianja\installers with the name you specified for New Installer. Your installer will be created as an executable (.exe) in this sub-folder and the name will include the 'PRODUCT_VERSION' from Step 1.
Running Installer
Your installer can now be run on the target Windows machine.
See here for more information on the NSIS Installer Builder and further ways it can be customized.
See Also
Deploying to LAN - Desktop and Web Clients, Deploying to Local Directory

