Difference between revisions of "Deploying to LAN - Desktop and Web Clients"
Yvonne.milne (Talk | contribs) |
Yvonne.milne (Talk | contribs) |
||
| Line 23: | Line 23: | ||
Note: For Lianja Web/Mobile Client Apps, open the App in the appropriate ''App View'' in the Lianja App Builder and click the '''Deploy''' button to generate the HTML5 index file for each of your target devices before deploying to the Server. For more information see [[Deploying to Local Directory|here]]. | Note: For Lianja Web/Mobile Client Apps, open the App in the appropriate ''App View'' in the Lianja App Builder and click the '''Deploy''' button to generate the HTML5 index file for each of your target devices before deploying to the Server. For more information see [[Deploying to Local Directory|here]]. | ||
| − | [[{{ns:file}}: | + | [[{{ns:file}}:lan_dev_dir.png|450px|thumb|left|link={{filepath:lan_dev_dir.png}}|Deploying from App Builder: Directory]] |
| Line 29: | Line 29: | ||
* In the '''Deploy''' workspace create a new deployment settings profile by clicking '''New''' and specifying a name. | * In the '''Deploy''' workspace create a new deployment settings profile by clicking '''New''' and specifying a name. | ||
| − | |||
| − | |||
| − | |||
| − | |||
| − | |||
| − | |||
| − | |||
| − | |||
| − | |||
| − | |||
| − | |||
| − | |||
| − | |||
| − | |||
| − | |||
- Here it is ''MyLAN_settings2'' | - Here it is ''MyLAN_settings2'' | ||
| Line 49: | Line 34: | ||
* Change the '''Directory''' to point to \lianja\cloudserver\tenants\public\ on the Server. | * Change the '''Directory''' to point to \lianja\cloudserver\tenants\public\ on the Server. | ||
| − | + | - Here P: has been mapped to ''public'' on the Server, so '''Directory''' is ''P:\'' | |
<br clear=all> | <br clear=all> | ||
Revision as of 11:12, 16 December 2015
Under construction
A Guide to Sharing Lianja Apps and Data between Desktop clients and Web/Mobile clients on a LAN.
Server Setup
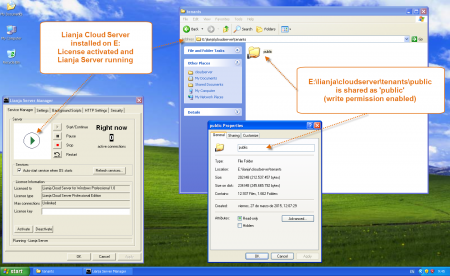
- Install the Lianja Cloud Server on the chosen server on your LAN.
- Here it is installed on the E: drive of an XP Virtual Machine.
- Create a share point on your server to the relevant tenancy directory. The default tenancy for users is 'public'. This corresponds to the \lianja\cloudserver\tenants\public\ directory.
- Here E:\lianja\cloudserver\tenants\public is shared as public.
Deploying to the Server
Note: For Lianja Web/Mobile Client Apps, open the App in the appropriate App View in the Lianja App Builder and click the Deploy button to generate the HTML5 index file for each of your target devices before deploying to the Server. For more information see here.
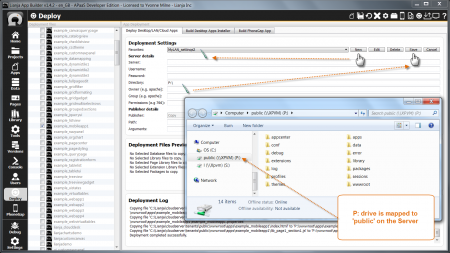
- In the Deploy workspace create a new deployment settings profile by clicking New and specifying a name.
- Here it is MyLAN_settings2
- Change the Directory to point to \lianja\cloudserver\tenants\public\ on the Server.
- Here P: has been mapped to public on the Server, so Directory is P:\
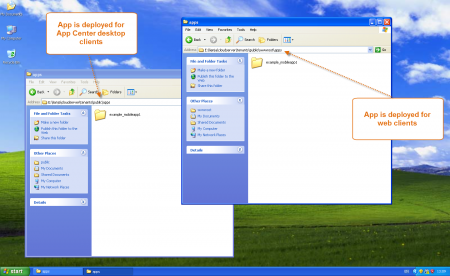
- Check the Server to see your deployed files.
- Remember to deploy your database and any additional Library script files as well as your Apps.
| Files | Deployed Location |
|---|---|
| Desktop Apps | \lianja\cloudserver\tenants\public\apps |
| Desktop Library | \lianja\cloudserver\tenants\public\library |
| Desktop Data | \lianja\cloudserver\tenants\public\data |
| Web/Mobile Apps | \lianja\cloudserver\tenants\public\wwwroot\apps |
| Web/Mobile Library | \lianja\cloudserver\tenants\public\wwwroot\library |
| Web/Mobile Data | \lianja\cloudserver\tenants\public\data |
Notice that data is shared between Desktop and Web/Mobile clients.
- This step is only required for versions prior to 1.5. From 1.5 onwards it is handled as part of Deploy above when the App has been deployed in the Web App View.
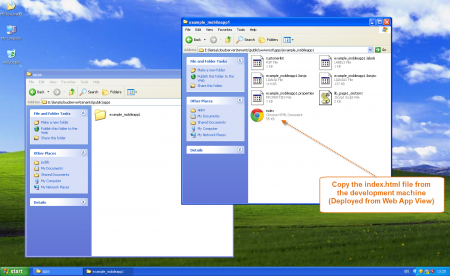
- For Web Clients, the index.html file must also be copied to the \lianja\cloudserver\tenants\public\wwwroot\apps\<appname>\ directory on the server.
- The index.html file is copied into your local \lianja\cloudserver\tenants\public\wwwroot\apps\<appname>\ directory when you Deploy from the Web App View.
Desktop Client
To run your deployed Apps from the Desktop Client:
- Install the App Center on the Client.
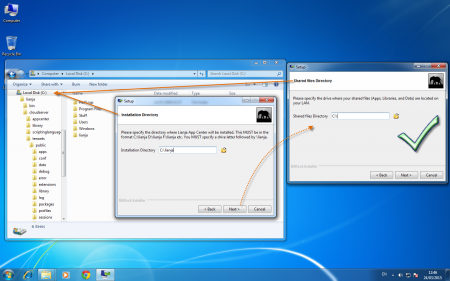
- The Shared files directory installation drive should be the same drive as the Installation Directory.
- Here the App Center has been installed on C:.
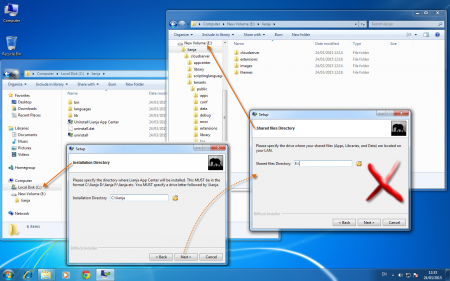
- If you specify a different drive, the installer will install the runtime directory structure for the data, Apps etc. on that drive.
- Here the App Center program files have been installed on C: and the runtime directories on E:.
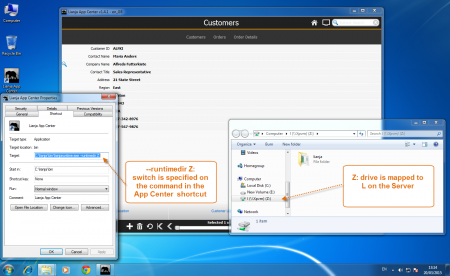
* Map a drive on the client to the Lianja drive on the Server.
(See below for using a directory share point on the Server.)
- Here Z: has been mapped to L (the Lianja drive) on the Server.
(Pre v1.4.1, use the same letter as the server drive, e.g. map L: to L on the Server.)
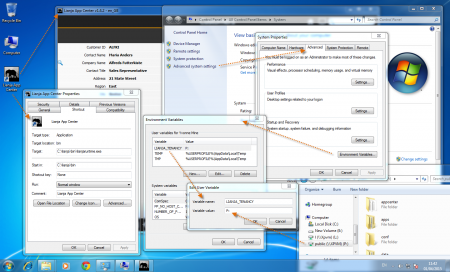
* Then, specify the --runtimedir <drive> switch on the App Center shortcut command.
(Or set up the environment variable LIANJA_RUNTIMEDIR - see next screenshot below).
- Here the command becomes: C:\lianja\bin\lianjaruntime.exe --runtimedir Z:.
(Pre 1.4.1, also add the --networkshare switch. Turned on automatically from v1.4.1.)
* As an alternative to using the --runtimedir switch above, the environment variable LIANJA_RUNTIMEDIR can be set to the mapped drive.
- Here LIANJA_RUNTIMEDIR has been set to Z: and no command switches are required.
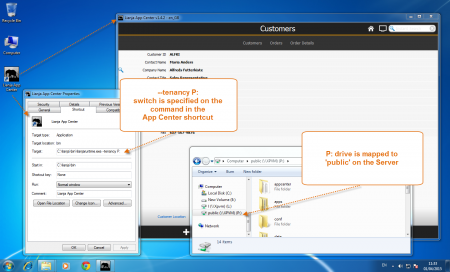
* To use a tenancy directory share point on the Server, map a drive on the client to the share point.
- Here P: has been mapped to public (the E:\lianja\cloudserver\tenants\public\ directory) on the Server.
* Then, specify the --tenancy <drive> switch on the App Center shortcut command to point to the \lianja\cloudserver\tenants\public\ directory share point on the Server.
(Or set up the environment variable LIANJA_TENANCY - see next screenshot below).
- Here the command becomes: C:\lianja\bin\lianjaruntime.exe --tenancy P:.
* As an alternative to using the --tenancy switch above, the environment variable LIANJA_TENANCY can be set to the mapped drive.
- Here LIANJA_TENANCY has been set to P: and no command switches are required.
Web Client
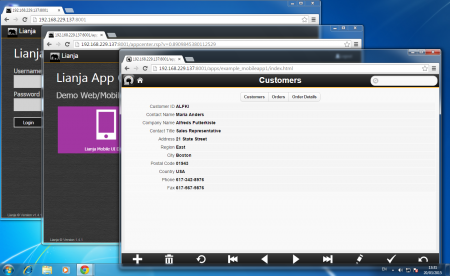
- To run Web or Mobile Apps, just point your browser at the IP address of the server.
- If you are using the IIS extension or have port 80 enabled:
http://192.168.X.X/login.rsp
- If you are running without port 80 enabled.
http://192.168.X.X:8001
See Also
Command Line Switches, Deploying to Local Directory, Lianja Server Manager on Windows, License Management on Windows
