Difference between revisions of "Data Files"
Yvonne.milne (Talk | contribs) (→Events) |
Yvonne.milne (Talk | contribs) (→Additional Commands) |
||
| (20 intermediate revisions by the same user not shown) | |||
| Line 26: | Line 26: | ||
</div> | </div> | ||
| − | ==== | + | ====Instant Search==== |
| + | From v5.3 the panel includes instant search. Just start typing the text you want to search for: | ||
| + | [[{{ns:file}}:datadatabases_instantsearch1.png|left|link={{filepath:datadatabases_instantsearch1.png}}|Instant Search]] | ||
| + | <br clear=all> | ||
| + | The display is updated as you type and as well as the mouse, you can also use the cursor keys and the return key to navigate and select: | ||
| + | [[{{ns:file}}:datadatabases_instantsearch2.png|left|link={{filepath:datadatabases_instantsearch2.png}}|Instant Search]] | ||
| + | <br clear=all> | ||
| + | |||
| + | ====Actionbar==== | ||
From the actionbar you can: | From the actionbar you can: | ||
* Create a '''New''' database. This option is not available when an App that already has an associated database is open. | * Create a '''New''' database. This option is not available when an App that already has an associated database is open. | ||
| Line 37: | Line 45: | ||
<br clear=all> | <br clear=all> | ||
| − | ==== | + | <div style="height:80px;margin-bottom:5px;padding:5px;border:0px solid orange;border-left:5px solid orange;background:#fff8dc;vertical-align:middle;position:relative;"> |
| + | [[File:bm-noteicon.png|top|40px|link=]]<div style="position:absolute;top:3px;margin-bottom;bottom:5px;margin-left:50px;"><b> Pro Tip</b> | ||
| + | You can use [[Custom Builders]] to intercept the new database default operation.<br/> | ||
| + | </div> | ||
| + | <span style="height:6px;"> </span> | ||
| + | </div> | ||
| + | ====Additional Commands==== | ||
[[{{ns:file}}:l5_datafiles3.png|left|link={{filepath:l5_datafiles3.png}}|Additional Commands]] | [[{{ns:file}}:l5_datafiles3.png|left|link={{filepath:l5_datafiles3.png}}|Additional Commands]] | ||
<br clear=all> | <br clear=all> | ||
| Line 72: | Line 86: | ||
|valign="top"|Create Virtual Tables from ODBC... | |valign="top"|Create Virtual Tables from ODBC... | ||
|valign="top"|Creates Virtual Tables for third-party data via ODBC in the currently open database. This option is not available when an App is open. See [[Virtual_Tables_-_Local_Development,_Remote_Deployment|Virtual Tables - Local Development, Remote Deployment]]. | |valign="top"|Creates Virtual Tables for third-party data via ODBC in the currently open database. This option is not available when an App is open. See [[Virtual_Tables_-_Local_Development,_Remote_Deployment|Virtual Tables - Local Development, Remote Deployment]]. | ||
| + | |- | ||
| + | |valign="top"|Create Virtual Tables from OLEDB... | ||
| + | |valign="top"|Creates Virtual Tables for third-party data via OLEDB in the currently open database. This option is not available when an App is open. See [[Virtual_Tables_-_Local_Development,_Remote_Deployment|Virtual Tables - Local Development, Remote Deployment]]. From v9.2.5. | ||
|- | |- | ||
|valign="top"|Close | |valign="top"|Close | ||
| Line 82: | Line 99: | ||
====Context Menu==== | ====Context Menu==== | ||
| − | |||
Right-clicking in the '''Database Names''' panel displays the databases context menu. | Right-clicking in the '''Database Names''' panel displays the databases context menu. | ||
[[{{ns:file}}:l5_datafiles4.png|left|link={{filepath:l5_datafiles4.png}}|Context Menu]] | [[{{ns:file}}:l5_datafiles4.png|left|link={{filepath:l5_datafiles4.png}}|Context Menu]] | ||
| Line 129: | Line 145: | ||
|valign="top"|Create Virtual Tables from ODBC... | |valign="top"|Create Virtual Tables from ODBC... | ||
|valign="top"|Creates Virtual Tables for third-party data via ODBC in the currently open database. This option is not available when an App is open. See [[Virtual_Tables_-_Local_Development,_Remote_Deployment|Virtual Tables - Local Development, Remote Deployment]]. | |valign="top"|Creates Virtual Tables for third-party data via ODBC in the currently open database. This option is not available when an App is open. See [[Virtual_Tables_-_Local_Development,_Remote_Deployment|Virtual Tables - Local Development, Remote Deployment]]. | ||
| + | |- | ||
| + | |valign="top"|Create Virtual Tables from OLEDB... | ||
| + | |valign="top"|Creates Virtual Tables for third-party data via OLEDB in the currently open database. This option is not available when an App is open. See [[Virtual_Tables_-_Local_Development,_Remote_Deployment|Virtual Tables - Local Development, Remote Deployment]]. From v9.2.5. | ||
|- | |- | ||
|valign="top"|Create Local Virtual Tables... | |valign="top"|Create Local Virtual Tables... | ||
| Line 151: | Line 170: | ||
====Table Names==== | ====Table Names==== | ||
| − | |||
Hover the mouse over a table name row to display information about the table: | Hover the mouse over a table name row to display information about the table: | ||
[[{{ns:file}}:l5_datafiles5.png|left|link={{filepath:l5_datafiles5.png}}|Data Files Tab: Tables]] | [[{{ns:file}}:l5_datafiles5.png|left|link={{filepath:l5_datafiles5.png}}|Data Files Tab: Tables]] | ||
<br clear=all> | <br clear=all> | ||
| − | ==== | + | =====Instant Search===== |
| + | From v5.3 the panel includes instant search. Just start typing the text you want to search for: | ||
| + | [[{{ns:file}}:datatables_instantsearch1.png|left|link={{filepath:datatables_instantsearch1.png}}|Instant Search]] | ||
| + | <br clear=all> | ||
| + | |||
| + | The display is updated as you type and as well as the mouse, you can also use the cursor keys and the return key to navigate and select: | ||
| + | [[{{ns:file}}:datatables_instantsearch2.png|left|link={{filepath:datatables_instantsearch2.png}}|Instant Search]] | ||
| + | <br clear=all> | ||
| + | =====Actionbar===== | ||
From the actionbar you can: | From the actionbar you can: | ||
* Create a '''New''' table. This will open the [[Creating_a_database_and_its_tables#Create_a_Table|CREATE A TABLE dialog]]. | * Create a '''New''' table. This will open the [[Creating_a_database_and_its_tables#Create_a_Table|CREATE A TABLE dialog]]. | ||
| Line 167: | Line 193: | ||
<br clear=all> | <br clear=all> | ||
| − | ==== | + | <div style="height:80px;margin-bottom:5px;padding:5px;border:0px solid orange;border-left:5px solid orange;background:#fff8dc;vertical-align:middle;position:relative;"> |
| + | [[File:bm-noteicon.png|top|40px|link=]]<div style="position:absolute;top:3px;margin-bottom;bottom:5px;margin-left:50px;"><b> Pro Tip</b> | ||
| + | You can use [[Custom Builders]] to intercept the new table default operation.<br/> | ||
| + | </div> | ||
| + | <span style="height:6px;"> </span> | ||
| + | </div> | ||
| + | =====Additional Commands===== | ||
[[{{ns:file}}:l5_datafiles7.png|left|link={{filepath:l5_datafiles7.png}}|Additional Commands]] | [[{{ns:file}}:l5_datafiles7.png|left|link={{filepath:l5_datafiles7.png}}|Additional Commands]] | ||
<br clear=all> | <br clear=all> | ||
| Line 194: | Line 226: | ||
|valign="top"|Decrypt... | |valign="top"|Decrypt... | ||
|valign="top"|Decrypts the currently selected table. See [[Encryption]]. | |valign="top"|Decrypts the currently selected table. See [[Encryption]]. | ||
| + | |- | ||
| + | |valign="top"|Table Designer... | ||
| + | |valign="top"|Opens the '''Table Designer''' for the currently selected table. This allows you to [[Creating_a_database_and_its_tables#Create_and_Modify_Columns|create and modify its columns]]. | ||
|- | |- | ||
|valign="top"|MetaData editor... | |valign="top"|MetaData editor... | ||
| Line 203: | Line 238: | ||
|valign="top"|Delete all... | |valign="top"|Delete all... | ||
|valign="top"|Deletes all the records in the currently selected table ([[ZAP]]). This option is not available when an App is open. | |valign="top"|Deletes all the records in the currently selected table ([[ZAP]]). This option is not available when an App is open. | ||
| + | |- | ||
| + | |valign="top"|Copy... | ||
| + | |valign="top"|Displays the file explorer dialog and [[COPY|copies]] the currently selected table to the chosen .dbf table name. From v8.0. | ||
| + | |- | ||
| + | |valign="top"|Export to CSV... | ||
| + | |valign="top"|Displays the file explorer dialog and [[Importing and Exporting Data|exports]] the currently selected table to the chosen .csv file name. From v8.0. | ||
| + | |- | ||
| + | |valign="top"|Export to Excel... | ||
| + | |valign="top"|Displays the file explorer dialog and [[Importing and Exporting Data|exports]] the currently selected table to the chosen .xml file name ([[SET XMLFORMAT|Excel format]]). From v8.0. | ||
| + | |- | ||
| + | |valign="top"|Export to XML... | ||
| + | |valign="top"|Displays the file explorer dialog and [[Importing and Exporting Data|exports]] the currently selected table to the chosen .xml file name ([[SET XMLFORMAT|Excel format]]). From v8.0. | ||
| + | |- | ||
| + | |valign="top"|Export to ADO... | ||
| + | |valign="top"|Displays the file explorer dialog and [[Importing and Exporting Data|exports]] the currently selected table to the chosen .xml file name ([[SET XMLFORMAT|ADO format]]). From v8.0. | ||
| + | |- | ||
| + | |valign="top"|Export to JSON... | ||
| + | |valign="top"|Displays the file explorer dialog and [[Importing and Exporting Data|exports]] the currently selected table to the chosen .json file name. From v8.0. | ||
| + | |- | ||
| + | |valign="top"|Import from CSV... | ||
| + | |valign="top"|Displays the file explorer dialog and [[Importing and Exporting Data|imports]] from the chosen .csv file name into the currently selected table. From v8.0. | ||
| + | |- | ||
| + | |valign="top"|Import from TABLE... | ||
| + | |valign="top"|Displays the file explorer dialog and [[Importing and Exporting Data|imports]] from the chosen .dbf table name into the currently selected table. From v8.0. | ||
|- | |- | ||
|valign="top"|Close all... | |valign="top"|Close all... | ||
| Line 212: | Line 271: | ||
|} | |} | ||
| − | ====Context Menu==== | + | =====Context Menu===== |
| − | + | ||
[[{{ns:file}}:df_tab_tables_cm.png|left|link={{filepath:df_tab_tables_cm.png}}|Context Menu]] | [[{{ns:file}}:df_tab_tables_cm.png|left|link={{filepath:df_tab_tables_cm.png}}|Context Menu]] | ||
<br clear=all> | <br clear=all> | ||
| Line 243: | Line 301: | ||
|- | |- | ||
|valign="top"|Remove... | |valign="top"|Remove... | ||
| − | |valign="top"|Removes the table from the current database. It does not delete the table. You will be prompted to confirm the operation. | + | |valign="top"|Removes the table from the current database. It does not delete the table. You will be prompted to confirm the operation. See also [[REMOVE TABLE]]. |
| − | See also [[REMOVE TABLE]]. | + | |
|- | |- | ||
|valign="top"|New virtual table... | |valign="top"|New virtual table... | ||
| Line 257: | Line 314: | ||
|valign="top"|Decrypt... | |valign="top"|Decrypt... | ||
|valign="top"|Decrypts the currently selected table. See [[Encryption]]. | |valign="top"|Decrypts the currently selected table. See [[Encryption]]. | ||
| + | |- | ||
| + | |valign="top"|Table Designer... | ||
| + | |valign="top"|Opens the '''Table Designer''' for the currently selected table. This allows you to [[Creating_a_database_and_its_tables#Create_and_Modify_Columns|create and modify its columns]]. | ||
|- | |- | ||
|valign="top"|MetaData editor... | |valign="top"|MetaData editor... | ||
| Line 266: | Line 326: | ||
|valign="top"|Delete all... | |valign="top"|Delete all... | ||
|valign="top"|Deletes all the records in the currently selected table ([[ZAP]]). This option is not available when an App is open. | |valign="top"|Deletes all the records in the currently selected table ([[ZAP]]). This option is not available when an App is open. | ||
| + | |- | ||
| + | |valign="top"|Copy... | ||
| + | |valign="top"|Displays the file explorer dialog and [[COPY|copies]] the currently selected table to the chosen .dbf table name. From v8.0. | ||
| + | |- | ||
| + | |valign="top"|Export to CSV... | ||
| + | |valign="top"|Displays the file explorer dialog and [[Importing and Exporting Data|exports]] the currently selected table to the chosen .csv file name. From v8.0. | ||
| + | |- | ||
| + | |valign="top"|Export to Excel... | ||
| + | |valign="top"|Displays the file explorer dialog and [[Importing and Exporting Data|exports]] the currently selected table to the chosen .xml file name ([[SET XMLFORMAT|Excel format]]). From v8.0. | ||
| + | |- | ||
| + | |valign="top"|Export to XML... | ||
| + | |valign="top"|Displays the file explorer dialog and [[Importing and Exporting Data|exports]] the currently selected table to the chosen .xml file name ([[SET XMLFORMAT|Excel format]]). From v8.0. | ||
| + | |- | ||
| + | |valign="top"|Export to ADO... | ||
| + | |valign="top"|Displays the file explorer dialog and [[Importing and Exporting Data|exports]] the currently selected table to the chosen .xml file name ([[SET XMLFORMAT|ADO format]]). From v8.0. | ||
| + | |- | ||
| + | |valign="top"|Export to JSON... | ||
| + | |valign="top"|Displays the file explorer dialog and [[Importing and Exporting Data|exports]] the currently selected table to the chosen .json file name. From v8.0. | ||
| + | |- | ||
| + | |valign="top"|Import from CSV... | ||
| + | |valign="top"|Displays the file explorer dialog and [[Importing and Exporting Data|imports]] from the chosen .csv file name into the currently selected table. From v8.0. | ||
| + | |- | ||
| + | |valign="top"|Import from TABLE... | ||
| + | |valign="top"|Displays the file explorer dialog and [[Importing and Exporting Data|imports]] from the chosen .dbf table name into the currently selected table. From v8.0. | ||
|- | |- | ||
|valign="top"|Close all... | |valign="top"|Close all... | ||
| Line 275: | Line 359: | ||
|} | |} | ||
| − | ===Column Names=== | + | ====Column Names==== |
| − | + | The middle panel in the '''Names''' tab displays the columns from the currently selected table. Double-click on a column name to open it in the [[Creating_a_database_and_its_tables#Create_and_Modify_Columns|Table Designer]] ('Modify a Column' dialog prior to v6.3) so you can modify its definition and/or attributes. | |
| − | The middle panel in the '''Names''' tab displays the columns from the currently selected table. Double-click on a column name to open it in the [[Creating_a_database_and_its_tables#Create_and_Modify_Columns| | + | |
Hover the mouse over a column name row to display information about the column: | Hover the mouse over a column name row to display information about the column: | ||
| Line 284: | Line 367: | ||
Note that the key symbol is displayed next to the Category ID file to indicate that the table has an index based on this column. Information on the key is also included in the information displayed when hovering over the column name. Indexes can be created from the Additional Commands (see below), or using the Lianja/VFP [[INDEX|index]] command or Lianja/SQL [[CREATE INDEX|create index]] command. | Note that the key symbol is displayed next to the Category ID file to indicate that the table has an index based on this column. Information on the key is also included in the information displayed when hovering over the column name. Indexes can be created from the Additional Commands (see below), or using the Lianja/VFP [[INDEX|index]] command or Lianja/SQL [[CREATE INDEX|create index]] command. | ||
| − | ==== | + | =====Instant Search===== |
| + | From v5.3 the panel includes instant search. Just start typing the text you want to search for: | ||
| + | [[{{ns:file}}:datacolumns_instantsearch1.png|left|link={{filepath:datacolumns_instantsearch1.png}}|Instant Search]] | ||
| + | <br clear=all> | ||
| + | |||
| + | The display is updated as you type and as well as the mouse, you can also use the cursor keys and the return key to navigate and select: | ||
| + | [[{{ns:file}}:datacolumns_instantsearch2.png|left|link={{filepath:datacolumns_instantsearch2.png}}|Instant Search]] | ||
| + | <br clear=all> | ||
| + | =====Actionbar===== | ||
From the actionbar you can: | From the actionbar you can: | ||
| − | * Create a '''New''' column. This opens the [[Creating_a_database_and_its_tables#Create_and_Modify_Columns| | + | * Create a '''New''' column. This opens the [[Creating_a_database_and_its_tables#Create_and_Modify_Columns|Table Designer]] ('Create a Column' dialog prior to v6.3). |
* '''Delete''' the currently selected column. You will be prompted to confirm the operation. | * '''Delete''' the currently selected column. You will be prompted to confirm the operation. | ||
* Navigate between the columns. | * Navigate between the columns. | ||
| Line 296: | Line 387: | ||
<br clear=all> | <br clear=all> | ||
| − | ====Additional Commands==== | + | =====Additional Commands===== |
| − | + | ||
[[{{ns:file}}:l5_datafiles10.png|left|link={{filepath:l5_datafiles10.png}}|Additional Commands]] | [[{{ns:file}}:l5_datafiles10.png|left|link={{filepath:l5_datafiles10.png}}|Additional Commands]] | ||
<br clear=all> | <br clear=all> | ||
| Line 306: | Line 396: | ||
|- | |- | ||
|valign="top"|Modify | |valign="top"|Modify | ||
| − | |valign="top"|Slides in the [[Creating_a_database_and_its_tables#Create_and_Modify_Columns| | + | |valign="top"|Slides in the [[Creating_a_database_and_its_tables#Create_and_Modify_Columns|Table Designer]] ('Modify a Column' dialog prior to v6.3) for the currently selected column. |
|- | |- | ||
|valign="top"|MetaData editor... | |valign="top"|MetaData editor... | ||
| Line 319: | Line 409: | ||
|} | |} | ||
| − | ====Context Menu==== | + | =====Context Menu===== |
The Column Names panel context menu is available from Lianja v5.3. | The Column Names panel context menu is available from Lianja v5.3. | ||
[[{{ns:file}}:df_tab_columns_cm.png|left|link={{filepath:df_tab_columns_cm.png}}|Context Menu]] | [[{{ns:file}}:df_tab_columns_cm.png|left|link={{filepath:df_tab_columns_cm.png}}|Context Menu]] | ||
| Line 329: | Line 419: | ||
|- | |- | ||
|valign="top"|Add... | |valign="top"|Add... | ||
| − | |valign="top"|Adds a column to the current table. This will slide in the [[Creating_a_database_and_its_tables#Create_and_Modify_Columns| | + | |valign="top"|Adds a column to the current table. This will slide in the [[Creating_a_database_and_its_tables#Create_and_Modify_Columns|Table Designer]] ('Create a Column' dialog prior to v6.3). |
|- | |- | ||
|valign="top"|Delete... | |valign="top"|Delete... | ||
| Line 335: | Line 425: | ||
|- | |- | ||
|valign="top"|Modify... | |valign="top"|Modify... | ||
| − | |valign="top"|Slides in the [[Creating_a_database_and_its_tables#Create_and_Modify_Columns| | + | |valign="top"|Slides in the [[Creating_a_database_and_its_tables#Create_and_Modify_Columns|Table Designer]] ('Modify a Column' dialog prior to v6.3) for the currently selected column. |
|- | |- | ||
|valign="top"|Index... | |valign="top"|Index... | ||
| Line 348: | Line 438: | ||
|} | |} | ||
| − | ===Column Attributes | + | ====Column Attributes==== |
The bottom panel in the '''Names''' tab displays the definition and optional attributes for the currently selected column. | The bottom panel in the '''Names''' tab displays the definition and optional attributes for the currently selected column. | ||
| Line 354: | Line 444: | ||
<br clear=all> | <br clear=all> | ||
| − | ====Actionbar==== | + | =====Actionbar===== |
From the actionbar you can: | From the actionbar you can: | ||
| − | * Create a '''New''' column. This opens the [[Creating_a_database_and_its_tables#Create_and_Modify_Columns| | + | * Create a '''New''' column. This opens the [[Creating_a_database_and_its_tables#Create_and_Modify_Columns|Table Designer]] ('Create a Column' dialog prior to v6.3). |
| − | * '''Edit''' the currently selected column. This opens the [[Creating_a_database_and_its_tables#Create_and_Modify_Columns| | + | * '''Edit''' the currently selected column. This opens the [[Creating_a_database_and_its_tables#Create_and_Modify_Columns|Table Designer]] ('Modify a Column' dialog prior to v6.3). |
* '''Delete''' the currently selected column. You will be prompted to confirm the operation. | * '''Delete''' the currently selected column. You will be prompted to confirm the operation. | ||
* Navigate between the columns. | * Navigate between the columns. | ||
| Line 367: | Line 457: | ||
<br clear=all> | <br clear=all> | ||
| − | ====Additional Commands==== | + | =====Additional Commands===== |
[[{{ns:file}}:l5_datafiles13.png|left|link={{filepath:l5_datafiles13.png}}|Additional Commands]] | [[{{ns:file}}:l5_datafiles13.png|left|link={{filepath:l5_datafiles13.png}}|Additional Commands]] | ||
| Line 377: | Line 467: | ||
|- | |- | ||
|valign="top"|Modify | |valign="top"|Modify | ||
| − | |valign="top"|Opens the [[Creating_a_database_and_its_tables#Create_and_Modify_Columns| | + | |valign="top"|Opens the [[Creating_a_database_and_its_tables#Create_and_Modify_Columns|Table Designer]] ('Modify a Column' dialog prior to v6.3) for the currently selected column. |
|- | |- | ||
|valign="top"|Refresh | |valign="top"|Refresh | ||
| Line 418: | Line 508: | ||
|} | |} | ||
| − | ==== | + | ====Instant Search==== |
| + | From v5.3 the panel includes instant search. Just start typing the text you want to search for: | ||
| + | [[{{ns:file}}:datatriggers_instantsearch1.png|left|link={{filepath:datatriggers_instantsearch1.png}}|Instant Search]] | ||
| + | <br clear=all> | ||
| + | The display is updated as you type and as well as the mouse, you can also use the cursor keys and the return key to navigate and select: | ||
| + | [[{{ns:file}}:datatriggers_instantsearch2.png|left|link={{filepath:datatriggers_instantsearch2.png}}|Instant Search]] | ||
| + | <br clear=all> | ||
| + | |||
| + | ====Actionbar==== | ||
From the actionbar you can: | From the actionbar you can: | ||
* '''Edit''' the selected trigger script. This will open the file in the [[Script Editor]] in the [[Apps Workspace]]. If no trigger script yet exists, it will be created and opened for editing. | * '''Edit''' the selected trigger script. This will open the file in the [[Script Editor]] in the [[Apps Workspace]]. If no trigger script yet exists, it will be created and opened for editing. | ||
| Line 432: | Line 530: | ||
<br clear=all> | <br clear=all> | ||
| − | ==== | + | ====Instant Search==== |
| + | From v5.3 the panel includes instant search. Just start typing the text you want to search for: | ||
| + | [[{{ns:file}}:dataprocs_instantsearch1.png|left|link={{filepath:dataprocs_instantsearch1.png}}|Instant Search]] | ||
| + | <br clear=all> | ||
| + | The display is updated as you type and as well as the mouse, you can also use the cursor keys and the return key to navigate and select: | ||
| + | [[{{ns:file}}:dataprocs_instantsearch2.png|left|link={{filepath:dataprocs_instantsearch2.png}}|Instant Search]] | ||
| + | <br clear=all> | ||
| + | |||
| + | ====Actionbar==== | ||
From the actionbar you can: | From the actionbar you can: | ||
* Create a '''New''' stored procedure file. This will prompt for the filename, create it and open it in the [[Script Editor]] in the [[Apps Workspace]]. | * Create a '''New''' stored procedure file. This will prompt for the filename, create it and open it in the [[Script Editor]] in the [[Apps Workspace]]. | ||
Latest revision as of 08:09, 14 September 2023
Contents
The App Inspector
The App Inspector display changes based on the current workspace, showing tabs relevant to that workspace.
Clicking the small icon on the far right of the App Inspector title bar will detach it into its own floating window.
Double clicking the window title bar when it is floating will attach it back into place.

The Data Files Tab
The Data Files Tab contains file lists pertaining to the Data Workspace.
Databases
The Databases tab contains the Database Names panel with a list of available databases.

Note: opening a database is not available when an App that already has an associated database is open.
If you have a project open you will only see the databases that have been added to that project.
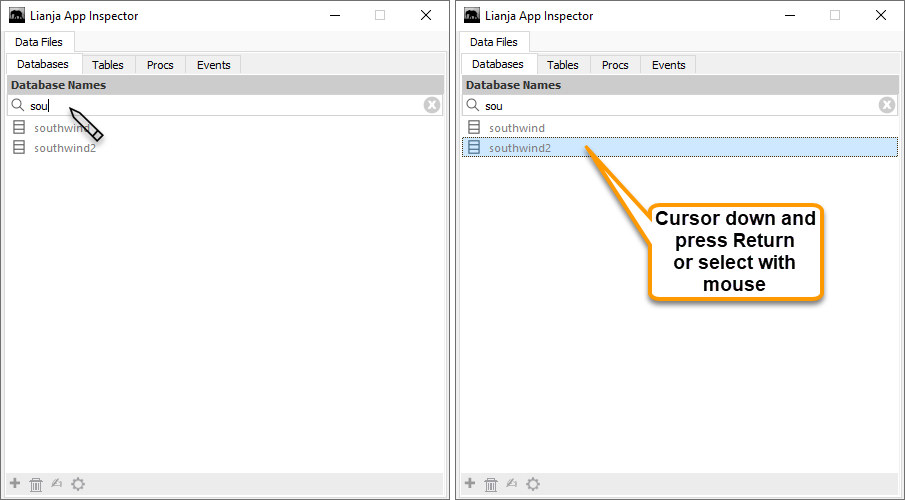
Instant Search
From v5.3 the panel includes instant search. Just start typing the text you want to search for:

The display is updated as you type and as well as the mouse, you can also use the cursor keys and the return key to navigate and select:
Actionbar
From the actionbar you can:
- Create a New database. This option is not available when an App that already has an associated database is open.
- Delete the currently selected database. This option is not available when an App is open or the selected database is open. You will be prompted to confirm the operation.
- Open the MetaData editor for the currently selected database. See MetaData Editor for information.
- Access Additional Commands by clicking the cog button.

Additional Commands

| Menu Option | More Information |
|---|---|
| Copy... | Copies the currently selected database. You will be prompted to enter the name for the copy. |
| Backup... | Backs up the currently selected database. This option is not available when an App is open. You will be prompted to confirm the operation. See also Backup and Restore during development. |
| Restore... | Restores the currently selected database. This option is not available when an App is open. You will be prompted to confirm the operation. See also Backup and Restore during development. |
| Rebuild... | Rebuilds the currently selected database. This option is not available when an App is open. You will be prompted to confirm the operation. |
| ODBC administrator | Opens the Windows 32-bit ODBC administrator. |
| Optimize... | Optimizes the currently selected database. This option is not available when an App is open. You will be prompted to confirm the operation. |
| Import VFP database... | Imports a VFP database. This option is not available when an App is open. A new database will be created for the import with the same name as the .dbc file. See Importing Visual FoxPro Databases and Tables. |
| Import ODBC database... | Imports third-party data via ODBC into the currently open database. This option is not available when an App is open. See Virtual Tables - Local Development, Remote Deployment. |
| Create Virtual Tables from ODBC... | Creates Virtual Tables for third-party data via ODBC in the currently open database. This option is not available when an App is open. See Virtual Tables - Local Development, Remote Deployment. |
| Create Virtual Tables from OLEDB... | Creates Virtual Tables for third-party data via OLEDB in the currently open database. This option is not available when an App is open. See Virtual Tables - Local Development, Remote Deployment. From v9.2.5. |
| Close | Closes the selected database. This option is not available when an App is open. |
| Refresh | Refreshes the database panel. |
Context Menu
Right-clicking in the Database Names panel displays the databases context menu.

| Menu Option | More Information |
|---|---|
| New... | Creates a new database. You will be prompted to enter the name for the new database. This option is not available when an App that already has an associated database is open. |
| Open | Opens the selected database. This option is not available when an App that already has an associated database is open. |
| Delete... | Deletes the currently selected database. This option is not available when an App is open or the selected database is open. You will be prompted to confirm the operation. |
| Copy... | Copies the currently selected database. You will be prompted to enter the name for the copy. |
| Backup... | Backs up the currently selected database. This option is not available when an App is open. You will be prompted to confirm the operation. See also Backup and Restore during development. |
| Restore... | Restores the currently selected database. This option is not available when an App is open. You will be prompted to confirm the operation. See also Backup and Restore during development. |
| Rebuild... | Rebuilds the currently selected database. This option is not available when an App is open. You will be prompted to confirm the operation. |
| Optimize... | Optimizes the currently selected database. This option is not available when an App is open. You will be prompted to confirm the operation. |
| Check... | Checks the currently selected database. This option is not available when an App is open. You will be prompted to confirm the operation. |
| ODBC administrator | Opens the Windows 32-bit ODBC administrator. |
| Import VFP database... | Imports a VFP database. This option is not available when an App is open. A new database will be created for the import with the same name as the .dbc file. See Importing Visual FoxPro Databases and Tables. |
| Import ODBC database... | Imports third-party data via ODBC into the currently open database. This option is not available when an App is open. See Virtual Tables - Local Development, Remote Deployment. |
| Create Virtual Tables from ODBC... | Creates Virtual Tables for third-party data via ODBC in the currently open database. This option is not available when an App is open. See Virtual Tables - Local Development, Remote Deployment. |
| Create Virtual Tables from OLEDB... | Creates Virtual Tables for third-party data via OLEDB in the currently open database. This option is not available when an App is open. See Virtual Tables - Local Development, Remote Deployment. From v9.2.5. |
| Create Local Virtual Tables... | Creates Virtual Tables for an existing database in the currently open database. This option is not available when an App is open. See Virtual Tables - Local Development, Remote Deployment. |
| Create Local Virtual Tables where 1=0... | Creates Virtual Tables with a zero row count for an existing database in the currently open database. This option is not available when an App is open. See Virtual Tables - Local Development, Remote Deployment. |
| Close | Closes the selected database. This option is not available when an App is open. |
| Refresh | Refreshes the database panel. |
Tables
The Tables tab contains the Names and Triggers tabs. The Names tab contains table and column lists, the Triggers tab a list of the available triggers and current trigger procedures.
Names
By default, when a database is open, the Names tab is displayed within the Data Files Tab. Click on a table name in the Table Names panel to select it and display its columns and their attributes in the lower panels. Double-click to open it in the Data Editor in the Data Workspace. Note that this operation is not available when an App is open.
Table Names
Hover the mouse over a table name row to display information about the table:

Instant Search
From v5.3 the panel includes instant search. Just start typing the text you want to search for:

The display is updated as you type and as well as the mouse, you can also use the cursor keys and the return key to navigate and select:

Actionbar
From the actionbar you can:
- Create a New table. This will open the CREATE A TABLE dialog.
- Delete the currently selected table. You will be prompted to confirm the operation.
- Open the MetaData editor for the currently selected table. See MetaData Editor for information.
- Access Additional Commands by clicking the cog button.

Additional Commands
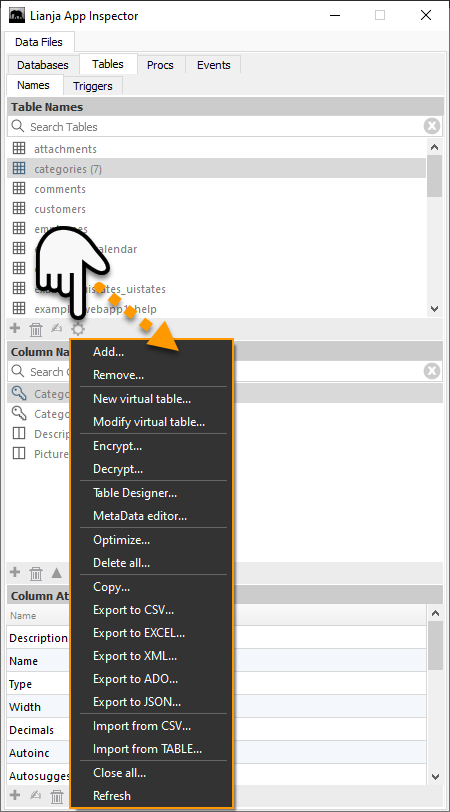
| Menu Option | More Information |
|---|---|
| Add... | Adds a table to the current database. This will open the Select a table dialog allowing you to select an existing table to add to the database. See also ADD TABLE. |
| Remove... | Removes the table from the current database. It does not delete the table. You will be prompted to confirm the operation.
See also REMOVE TABLE. |
| New virtual table... | Creates a new virtual table in the current database. You will be prompted to enter a name for the new virtual table, then the CREATE A VIRTUAL TABLE dialog will be displayed to allow you to configure the virtual table. |
| Modify virtual table... | Modifies the currently selected virtual table. This option is not available when a native table is selected. The MODIFY A VIRTUAL TABLE dialog will be displayed to allow you to modify the virtual table. |
| Encrypt... | Encrypts the currently selected table. See Encryption. |
| Decrypt... | Decrypts the currently selected table. See Encryption. |
| Table Designer... | Opens the Table Designer for the currently selected table. This allows you to create and modify its columns. |
| MetaData editor... | Opens the MetaData editor for the currently selected table. See MetaData Editor for information. |
| Optimize... | Optimizes the currently selected table. This option is not available when an App is open. |
| Delete all... | Deletes all the records in the currently selected table (ZAP). This option is not available when an App is open. |
| Copy... | Displays the file explorer dialog and copies the currently selected table to the chosen .dbf table name. From v8.0. |
| Export to CSV... | Displays the file explorer dialog and exports the currently selected table to the chosen .csv file name. From v8.0. |
| Export to Excel... | Displays the file explorer dialog and exports the currently selected table to the chosen .xml file name (Excel format). From v8.0. |
| Export to XML... | Displays the file explorer dialog and exports the currently selected table to the chosen .xml file name (Excel format). From v8.0. |
| Export to ADO... | Displays the file explorer dialog and exports the currently selected table to the chosen .xml file name (ADO format). From v8.0. |
| Export to JSON... | Displays the file explorer dialog and exports the currently selected table to the chosen .json file name. From v8.0. |
| Import from CSV... | Displays the file explorer dialog and imports from the chosen .csv file name into the currently selected table. From v8.0. |
| Import from TABLE... | Displays the file explorer dialog and imports from the chosen .dbf table name into the currently selected table. From v8.0. |
| Close all... | Closes all the tables. This option is not available when an App is open. |
| Refresh | Refreshes the Table Names panel. |
Context Menu

| Menu Option | More Information |
|---|---|
| New... | Creates a New table. This will open the CREATE A TABLE dialog. |
| Open | Opens the currently selected table in the Data Editor in the Data Workspace. Note that this operation is not available when an App is open. |
| Open in Window | Opens the currently selected table in the Data Editor in the a floating window. Note that this operation is not available when an App is open. |
| Show in Explorer | Opens the location of the currently selected table in the operating system file explorer. |
| Open Command Prompt Here | Opens an operating system command prompt in the current database's directory. |
| Delete... | Deletes the currently selected table. You will be prompted to confirm the operation. |
| Add... | Adds a table to the current database. This will open the Select a table dialog allowing you to select an existing table to add to the database. See also ADD TABLE. |
| Remove... | Removes the table from the current database. It does not delete the table. You will be prompted to confirm the operation. See also REMOVE TABLE. |
| New virtual table... | Creates a new virtual table in the current database. You will be prompted to enter a name for the new virtual table, then the CREATE A VIRTUAL TABLE dialog will be displayed to allow you to configure the virtual table. |
| Modify virtual table... | Modifies the currently selected virtual table. This option is not available when a native table is selected. The MODIFY A VIRTUAL TABLE dialog will be displayed to allow you to modify the virtual table. |
| Encrypt... | Encrypts the currently selected table. See Encryption. |
| Decrypt... | Decrypts the currently selected table. See Encryption. |
| Table Designer... | Opens the Table Designer for the currently selected table. This allows you to create and modify its columns. |
| MetaData editor... | Opens the MetaData editor for the currently selected table. See MetaData Editor for information. |
| Optimize... | Optimizes the currently selected table. This option is not available when an App is open. |
| Delete all... | Deletes all the records in the currently selected table (ZAP). This option is not available when an App is open. |
| Copy... | Displays the file explorer dialog and copies the currently selected table to the chosen .dbf table name. From v8.0. |
| Export to CSV... | Displays the file explorer dialog and exports the currently selected table to the chosen .csv file name. From v8.0. |
| Export to Excel... | Displays the file explorer dialog and exports the currently selected table to the chosen .xml file name (Excel format). From v8.0. |
| Export to XML... | Displays the file explorer dialog and exports the currently selected table to the chosen .xml file name (Excel format). From v8.0. |
| Export to ADO... | Displays the file explorer dialog and exports the currently selected table to the chosen .xml file name (ADO format). From v8.0. |
| Export to JSON... | Displays the file explorer dialog and exports the currently selected table to the chosen .json file name. From v8.0. |
| Import from CSV... | Displays the file explorer dialog and imports from the chosen .csv file name into the currently selected table. From v8.0. |
| Import from TABLE... | Displays the file explorer dialog and imports from the chosen .dbf table name into the currently selected table. From v8.0. |
| Close all... | Closes all the tables. This option is not available when an App is open. |
| Refresh | Refreshes the Table Names panel. |
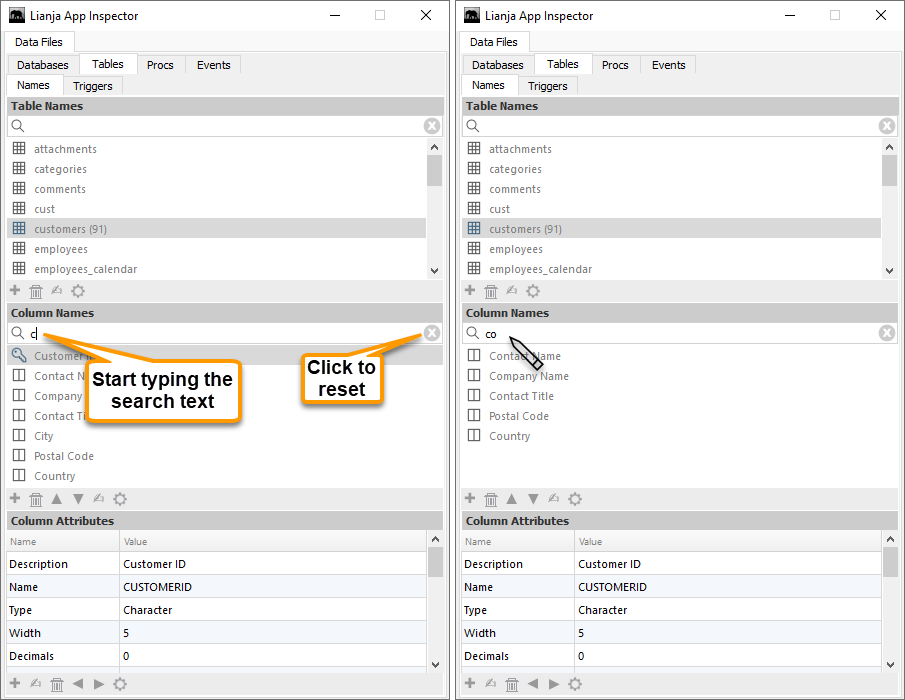
Column Names
The middle panel in the Names tab displays the columns from the currently selected table. Double-click on a column name to open it in the Table Designer ('Modify a Column' dialog prior to v6.3) so you can modify its definition and/or attributes.
Hover the mouse over a column name row to display information about the column:

Note that the key symbol is displayed next to the Category ID file to indicate that the table has an index based on this column. Information on the key is also included in the information displayed when hovering over the column name. Indexes can be created from the Additional Commands (see below), or using the Lianja/VFP index command or Lianja/SQL create index command.
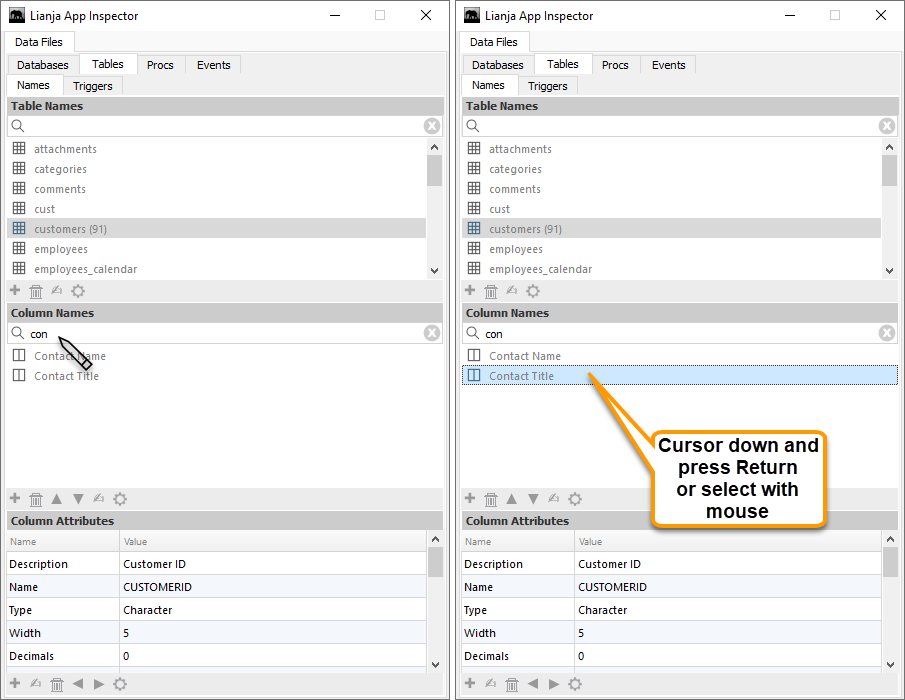
Instant Search
From v5.3 the panel includes instant search. Just start typing the text you want to search for:
The display is updated as you type and as well as the mouse, you can also use the cursor keys and the return key to navigate and select:
Actionbar
From the actionbar you can:
- Create a New column. This opens the Table Designer ('Create a Column' dialog prior to v6.3).
- Delete the currently selected column. You will be prompted to confirm the operation.
- Navigate between the columns.
- Open the MetaData editor for the currently selected column. See MetaData Editor for information.
- Access Additional Commands by clicking the cog button.

Additional Commands

| Menu Option | More Information |
|---|---|
| Modify | Slides in the Table Designer ('Modify a Column' dialog prior to v6.3) for the currently selected column. |
| MetaData editor... | Opens the MetaData editor for the currently selected column. See MetaData Editor for information. |
| Index... | Creates an index tag using the currently selected column as the key. You will be prompted to confirm the operation. |
| Refresh | Refreshes the Column Names panel. |
Context Menu
The Column Names panel context menu is available from Lianja v5.3.

| Menu Option | More Information |
|---|---|
| Add... | Adds a column to the current table. This will slide in the Table Designer ('Create a Column' dialog prior to v6.3). |
| Delete... | Deletes the currently selected column. You will be prompted to confirm the operation. |
| Modify... | Slides in the Table Designer ('Modify a Column' dialog prior to v6.3) for the currently selected column. |
| Index... | Creates an index tag using the currently selected column as the key. You will be prompted to confirm the operation. |
| MetaData editor... | Opens the MetaData editor for the currently selected column. See MetaData Editor for information. |
| Refresh | Refreshes the Column Names panel. |
Column Attributes
The bottom panel in the Names tab displays the definition and optional attributes for the currently selected column.

Actionbar
From the actionbar you can:
- Create a New column. This opens the Table Designer ('Create a Column' dialog prior to v6.3).
- Edit the currently selected column. This opens the Table Designer ('Modify a Column' dialog prior to v6.3).
- Delete the currently selected column. You will be prompted to confirm the operation.
- Navigate between the columns.
- Access Additional Commands by clicking the cog button.

Additional Commands

| Menu Option | More Information |
|---|---|
| Modify | Opens the Table Designer ('Modify a Column' dialog prior to v6.3) for the currently selected column. |
| Refresh | Refreshes the Column Attributes panel. |
Triggers
The Triggers tab contains a list of Trigger Names.
Double-click a trigger name to create a Lianja/VFP script (.prg) to be associated with the trigger operation. The file will be created in the format:
<table-name>_<trigger-name>.prg
and will be opened in the Script Editor in the Apps Workspace.
If a script has already been associated with the trigger, the script name will appear in the list and double-clicking it will open it for editing in the Script Editor in the Apps Workspace.
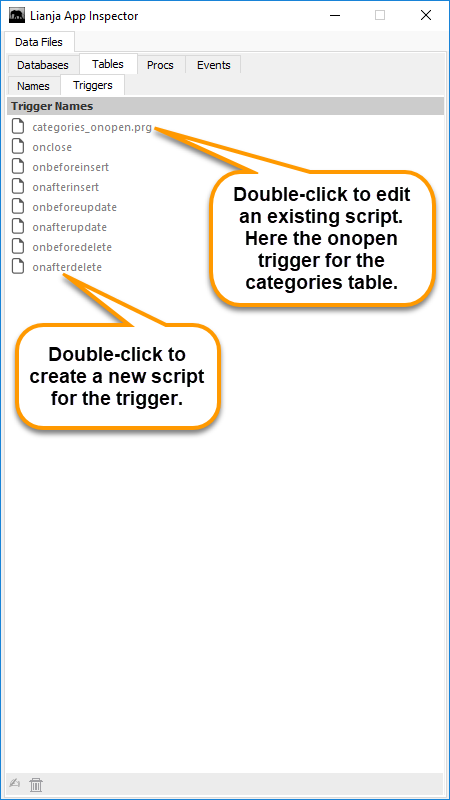
| Trigger | Operation |
|---|---|
| onopen | Called after the table is opened. |
| onclose | Called before the table is closed. |
| onbeforeinsert | Called before inserting a record into the table. The script must return .T. (true) or the operation will be cancelled. |
| onafterinsert | Called after inserting a record into the table. |
| onbeforeupdate | Called before modifying an existing record. The script must return .T. (true) or the operation will be cancelled. |
| onafterupdate | Called after modifying an existing record. |
| onbeforedelete | Called before deleting an existing record. The script must return .T. (true) or the operation will be cancelled. |
| onafterdelete | Called after deleting an existing record. |
Instant Search
From v5.3 the panel includes instant search. Just start typing the text you want to search for:

The display is updated as you type and as well as the mouse, you can also use the cursor keys and the return key to navigate and select:

Actionbar
From the actionbar you can:
- Edit the selected trigger script. This will open the file in the Script Editor in the Apps Workspace. If no trigger script yet exists, it will be created and opened for editing.
- Delete the selected trigger script. You will be prompted to confirm the operation.

Procs
The Procs tab contains a list of stored procedure filenames.

Instant Search
From v5.3 the panel includes instant search. Just start typing the text you want to search for:

The display is updated as you type and as well as the mouse, you can also use the cursor keys and the return key to navigate and select:

Actionbar
From the actionbar you can:
- Create a New stored procedure file. This will prompt for the filename, create it and open it in the Script Editor in the Apps Workspace.
- Edit the selected stored procedure file. This will open the file in the Script Editor in the Apps Workspace.
- Delete the selected stored procedure file. You will be prompted to confirm the operation.

See also Virtual Tables - Local Stored Procedures.
Events
The Events tab contains a list of Database Events.
Double-click an event name to create a Lianja/VFP script (.prg) to be associated with the event. The file will be created in the format:
<event>.prg
and will be opened in the Script Editor in the Apps Workspace.
If a script has already been associated with the event, the script name will appear in the list and double-clicking it will open it for editing in the Script Editor in the Apps Workspace.

Instant Search
From v5.3 the panel includes instant search. Just start typing the text you want to search for:

The display is updated as you type and as well as the mouse, you can also use the cursor keys and the return key to navigate and select:

Actionbar
From the actionbar you can:
- Edit the selected event script. This will open the file in the Script Editor in the Apps Workspace. If no event script yet exists, it will be created and opened for editing.
- Delete the selected event script. You will be prompted to confirm the operation.
