Difference between revisions of "Creating a Self-Signed Certificate (Linux Apache)"
Yvonne.milne (Talk | contribs) m (Yvonne.milne moved page Creating a Self-Signed Certificate (Apache) to Creating a Self-Signed Certificate (Linux Apache) without leaving a redirect) |
Yvonne.milne (Talk | contribs) |
||
| Line 1: | Line 1: | ||
''Under Construction'' | ''Under Construction'' | ||
| − | = | + | |
| + | =Overview= | ||
| + | A self-signed SSL certificate is a certificate that is signed by the person who created it rather than a trusted certificate authority. Self-signed certificates can have the same level of encryption as the trusted CA-signed SSL certificate. | ||
| + | |||
| + | Typically, the self-signed certificates are used for testing purposes or internal usage. You should not use a self-signed certificate in production systems that are exposed to the Internet. | ||
| + | |||
| + | =Centos= | ||
| + | The following package are required: | ||
| + | <pre>$ sudo yum install mod_ssl openssl</pre> | ||
| + | |||
| + | ==Create Certificate== | ||
| + | Use the openssl req command to create a self-signed certificate: | ||
| + | [[{{ns:file}}:ssc_centoscreate.png|800px|left|border|link={{filepath:ssc_centoscreate.png}}|Create Certificate]] | ||
| + | <br clear=all> | ||
| + | Issue the command, e.g. for my site 'centos-8.lianja.local': | ||
| + | <pre>$ sudo openssl req -newkey rsa:4096 -x509 -sha256 -days 365 -nodes \ | ||
| + | -addext "subjectAltName = DNS:centos-8.lianja.local" \ | ||
| + | -out localhost.crt -keyout localhost.key</pre> | ||
| + | Then enter the information at the prompts. | ||
| + | |||
| + | Note: the '-addext "subjectAltName = DNS:<valid name>"' must be included to allow the certificate to be subsequently imported into Chrome. | ||
| + | |||
| + | [https://www.openssl.org/docs/man1.1.1/man1/openssl-req.html See here for full details of the openssl req command.] | ||
| + | |||
| + | Once the files have been created - here 'localhost.crt' and 'localhost.key' - copy them to the locations specified in the /etc/httpd/conf.d/ssl.conf file: | ||
| + | <pre>$ sudo cp localhost.crt /etc/pki/tls/certs | ||
| + | $ sudo cp localhost.key /etc/pki/tls/private</pre> | ||
| + | [[{{ns:file}}:ssc_centoscerts.png|800px|left|border|link={{filepath:ssc_centoscerts.png}}|Certificate File Locations]] | ||
| + | <br clear=all> | ||
| + | |||
| + | ==Chrome== | ||
| + | [[{{ns:file}}:ssc_centoschrome1.png|800px|left|border|link={{filepath:ssc_centoschrome1.png}}|Chrome]] | ||
| + | <br clear=all> | ||
| + | |||
| + | [[{{ns:file}}:ssc_centoschrome2.png|800px|left|border|link={{filepath:ssc_centoschrome2.png}}|Chrome]] | ||
| + | <br clear=all> | ||
| + | |||
| + | [[{{ns:file}}:ssc_centoschrome3.png|800px|left|border|link={{filepath:ssc_centoschrome3.png}}|Chrome]] | ||
| + | <br clear=all> | ||
| + | |||
| + | [[{{ns:file}}:ssc_centoschrome4.png|800px|left|border|link={{filepath:ssc_centoschrome4.png}}|Chrome]] | ||
| + | <br clear=all> | ||
| + | |||
| + | [[{{ns:file}}:ssc_centoschrome5.png|800px|left|border|link={{filepath:ssc_centoschrome5.png}}|Chrome]] | ||
| + | <br clear=all> | ||
| + | |||
| + | [[{{ns:file}}:ssc_centoschrome6.png|800px|left|border|link={{filepath:ssc_centoschrome6.png}}|Chrome]] | ||
| + | <br clear=all> | ||
| + | |||
| + | [[{{ns:file}}:ssc_centoschrome7.png|800px|left|border|link={{filepath:ssc_centoschrome7.png}}|Chrome]] | ||
| + | <br clear=all> | ||
| + | |||
| + | [[{{ns:file}}:ssc_centoschrome8.png|800px|left|border|link={{filepath:ssc_centoschrome8.png}}|Chrome]] | ||
| + | <br clear=all> | ||
| + | |||
| + | [[{{ns:file}}:ssc_centoschrome9.png|800px|left|border|link={{filepath:ssc_centoschrome9.png}}|Chrome]] | ||
| + | <br clear=all> | ||
| + | |||
| + | [[{{ns:file}}:ssc_centoschrome10.png|800px|left|border|link={{filepath:ssc_centoschrome10.png}}|Chrome]] | ||
| + | <br clear=all> | ||
| + | |||
| + | =Ubuntu= | ||
# [[#Create_Certificate_2|Create a self-signed certificate using openssl]] | # [[#Create_Certificate_2|Create a self-signed certificate using openssl]] | ||
# [[#Site_Configuration_File|Update the site configuration file with the location of the certificate files]] | # [[#Site_Configuration_File|Update the site configuration file with the location of the certificate files]] | ||
| Line 26: | Line 87: | ||
Once the certificate has been created and the files are in your desired location, create / edit your site conf file and add in the '''SSLCertificateFile''' and '''SSLCertificateKeyFile''' entries to point to the files. | Once the certificate has been created and the files are in your desired location, create / edit your site conf file and add in the '''SSLCertificateFile''' and '''SSLCertificateKeyFile''' entries to point to the files. | ||
| − | |||
<pre> | <pre> | ||
VirtualHost *:443> | VirtualHost *:443> | ||
| Line 59: | Line 119: | ||
Note: here the index page has been redirected to the Lianja login page. See the [[#Site Configuration File|conf file above]]. | Note: here the index page has been redirected to the Lianja login page. See the [[#Site Configuration File|conf file above]]. | ||
| + | |||
| + | [[Category:Lianja v6.0]] | ||
| + | [[Category:Lianja Cloud Server]] | ||
| + | [[Category:Lianja Server]] | ||
| + | [[Category:Installation on Linux]] | ||
| + | [[Category:Installation]] | ||
Revision as of 13:34, 10 February 2021
Under Construction
Contents
Overview
A self-signed SSL certificate is a certificate that is signed by the person who created it rather than a trusted certificate authority. Self-signed certificates can have the same level of encryption as the trusted CA-signed SSL certificate.
Typically, the self-signed certificates are used for testing purposes or internal usage. You should not use a self-signed certificate in production systems that are exposed to the Internet.
Centos
The following package are required:
$ sudo yum install mod_ssl openssl
Create Certificate
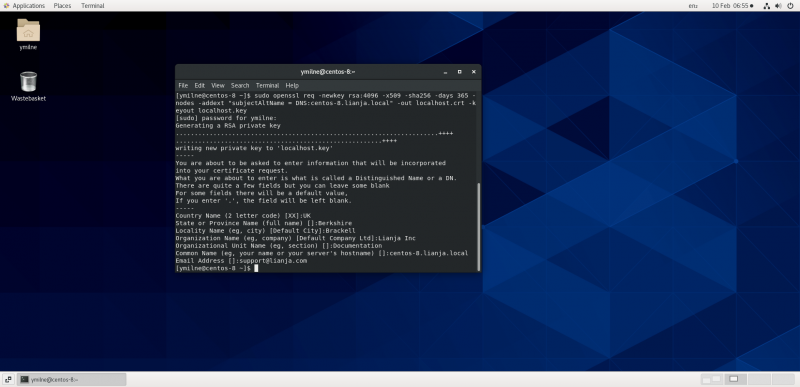
Use the openssl req command to create a self-signed certificate:
Issue the command, e.g. for my site 'centos-8.lianja.local':
$ sudo openssl req -newkey rsa:4096 -x509 -sha256 -days 365 -nodes \
-addext "subjectAltName = DNS:centos-8.lianja.local" \
-out localhost.crt -keyout localhost.key
Then enter the information at the prompts.
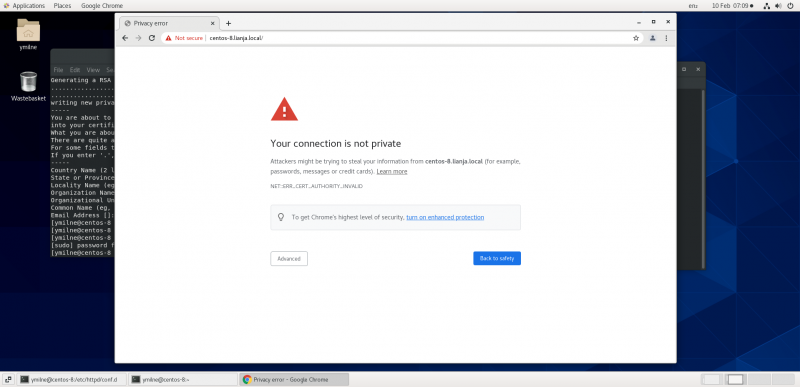
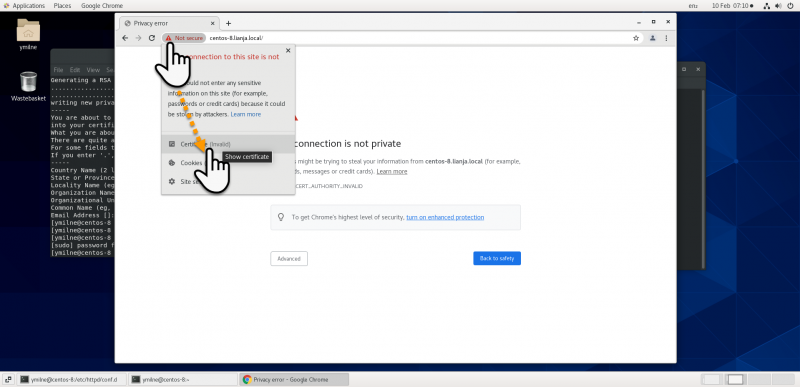
Note: the '-addext "subjectAltName = DNS:<valid name>"' must be included to allow the certificate to be subsequently imported into Chrome.
See here for full details of the openssl req command.
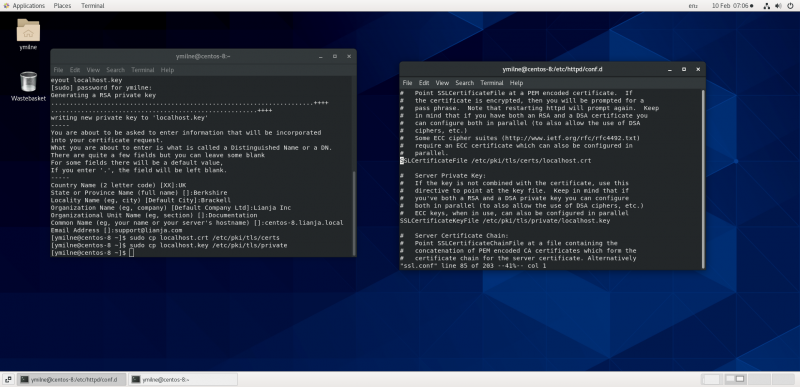
Once the files have been created - here 'localhost.crt' and 'localhost.key' - copy them to the locations specified in the /etc/httpd/conf.d/ssl.conf file:
$ sudo cp localhost.crt /etc/pki/tls/certs
$ sudo cp localhost.key /etc/pki/tls/private
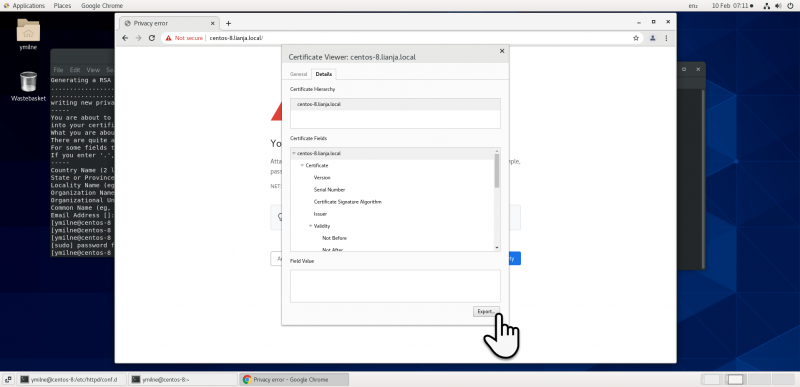
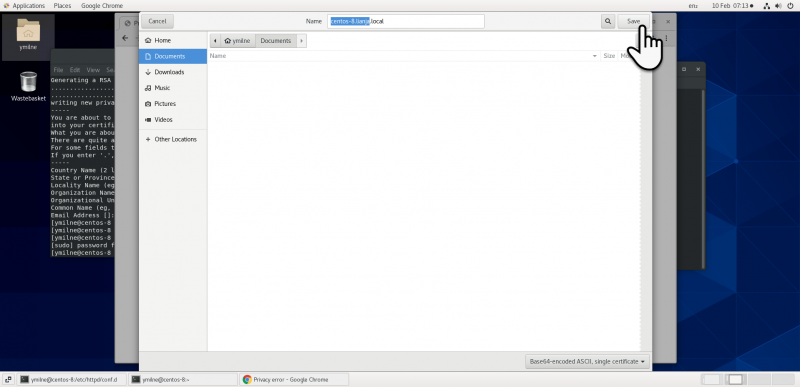
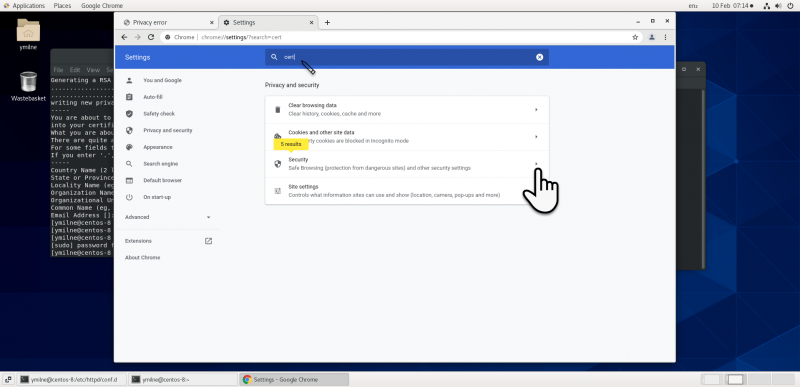
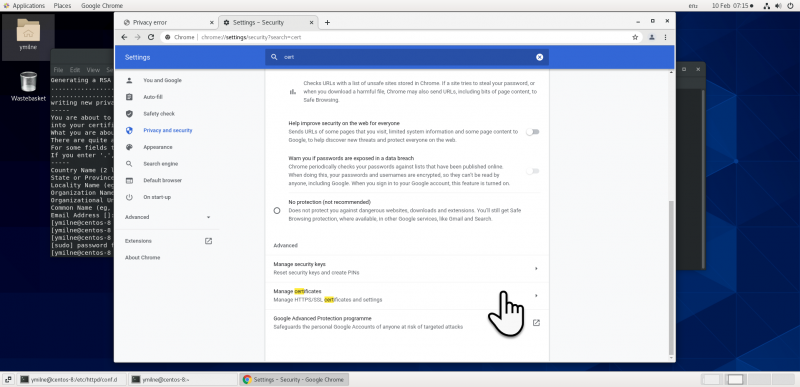
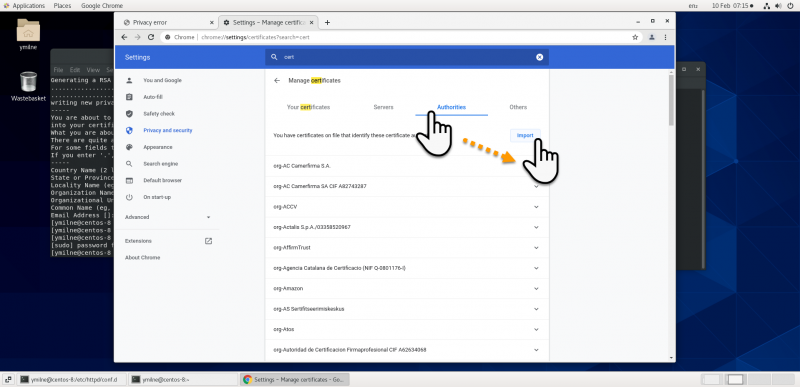
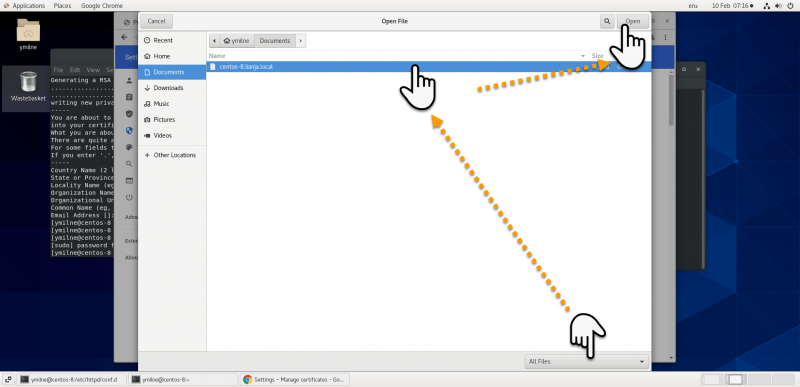
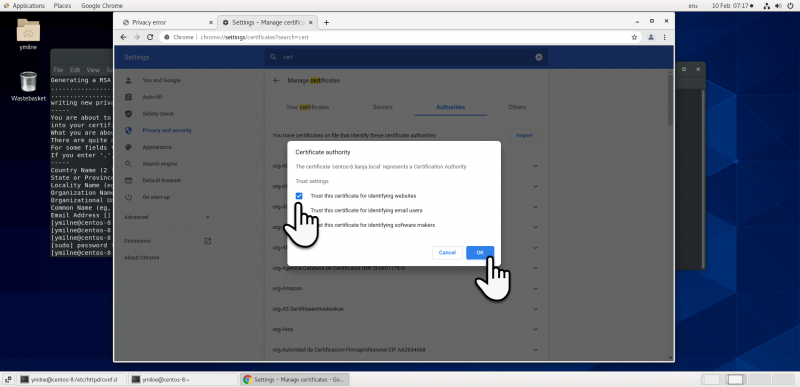
Chrome
Ubuntu
- Create a self-signed certificate using openssl
- Update the site configuration file with the location of the certificate files
- Import the certificate into Chrome
Create Certificate
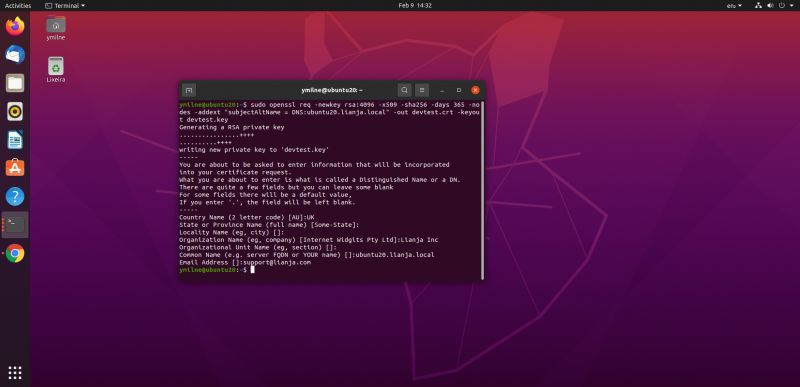
Use the openssl req command to create a self-signed certificate:
Issue the command, e.g. for my site 'ubuntu20.lianja.local':
$ sudo openssl req -newkey rsa:4096 -x509 -sha256 -days 365 -nodes \
-addext "subjectAltName = DNS:ubuntu20.lianja.local" \
-out devtest.crt -keyout devtest.key
Then enter the information at the prompts.
Note: the '-addext "subjectAltName = DNS:<valid name>"' must be included to allow the certificate to be subsequently imported into Chrome.
See here for full details of the openssl req command.
Once the files have been created - here 'devtest.crt' and 'devtest.key' - copy them to an appropriate directory, e.g.
$ sudo mkdir /etc/apache2/ssl
$ sudo cp devtest.* /etc/apache2/ssl
Site Configuration File
Once the certificate has been created and the files are in your desired location, create / edit your site conf file and add in the SSLCertificateFile and SSLCertificateKeyFile entries to point to the files.
VirtualHost *:443>
    ServerAdmin webmaster@localhost
    ServerName lianja.local
    ServerAlias 192.168.80.136
    DocumentRoot /opt/lianja/cloudserver/tenants/public/wwwroot/
    ErrorLog ${APACHE_LOG_DIR}/error.log
    CustomLog ${APACHE_LOG_DIR}/access.log combined
    SSLEngine on
    SSLCertificateFile /etc/apache2/ssl/devtest.crt
    SSLCertificateKeyFile /etc/apache2/ssl/devtest.key
    <Directory /opt/lianja/cloudserver/tenants/public/wwwroot/>
        Options Indexes FollowSymLinks
        AllowOverride None
        Require all granted
    </Directory>
    <Location "/">
        Redirect permanent "/index.html" "/login.rsp"
    </Location>
</VirtualHost>
Note: the above virtual site configuration includes entries for the Directory to point to the Lianja wwwroot directory and a Redirect to load the Lianja login page if no page or the default index.html page is requested. See Apache Module for Linux for information on installing and configuring the module.
Chrome
...
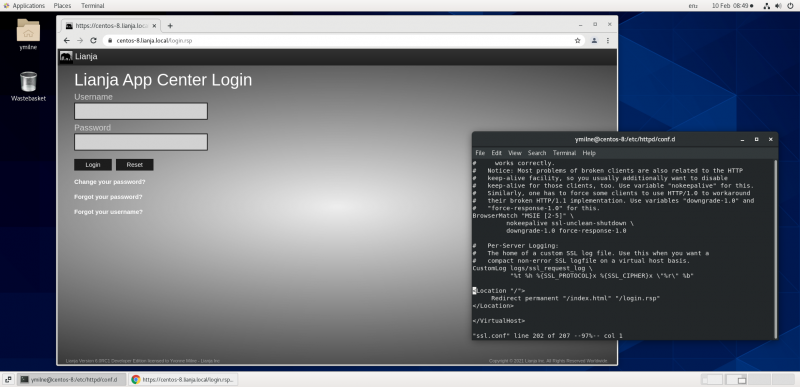
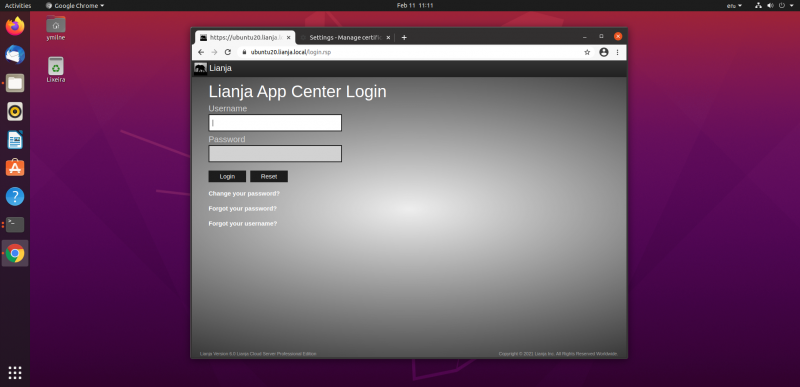
You will now be able to access your https site from Chrome:
Note: here the index page has been redirected to the Lianja login page. See the conf file above.
