Deprecated: Cross Platform App Deployment with Lianja
Under Construction
Contents
See Also
A Guide to Deploying Web Apps, Deployment (Category), Deploying to Local Directory, Understanding Live Preview in Lianja
Develop native on Windows, Linux or macOS and deploy directly from the IDE to Windows,
Linux, macOS, iOS or Android.
Web Apps
- Deploy in Web App View to generate the HTML5 index.html code and deploy the App's files to your local Lianja Cloud Server deployment path.
- Deploy your Apps, databases and Library and MetaTypes files to a remote location, using the Deploy workspace.
Web App View
Web App View gives you options to Deploy your App for your local Lianja Cloud Server (this generates the HTML5 index file and copies the App's files to the deployment path) and to Preview the App running in your default browser prior to deploying to a remote server.

Click the toolbutton in the header to access Web App View.
Click Deploy in Web App View to generate the HTML5 index file and copy the App's files to the deployment path.
For testing purposes, you can click Preview to preview your App live in your default browser.
Now deploy your Apps, databases and Library and MetaTypes files to a remote location, using the Deploy workspace.
Deploying Desktop and Web Apps
You can go directly to the Deploy workspace via the system menu or Modebar, or use the Quick Deploy toolbutton in the headerbar of the Pages and other workspaces.
Quick Deploy
Quick Deploy can be run while the App is open. Quick Deploy automatically saves and restores the environment, closing the database and tables for the deployment then reopening them when the operation is complete.
Quick Deploy defaults to using the App Deployment Settings:
| Attribute | Description |
|---|---|
| Publisher | The way to publish the Apps (Copy | SFTP | Custom). |
| Publisher path | The optional full path of the publisher program, e.g. /usr/bin/rsync. |
| Publisher arguments | The optional arguments to the publisher program, e.g. -avc for rsync. |
| Server | The server IP address or nodename where the App will be deployed, e.g. localhost or myserver.mydomain.com. |
| Directory | The root lianja directory on the LAN or server where the Apps will be deployed. |
| Build an installer | Build an installer for Windows desktop deployment (True | False). |
| Username | The optional username to authenticate with the remote server. |
| Password | The optional password to authenticate with the remote server. |
| Private key (.pem file) | The (optional) private key (.pem file) to authenticate with the remote server. |

For example, here the files will be deployed:
- using Copy (Publisher)
- to the networked drive location G:\lianja\cloudserver\tenants\public\ (Directory)

And another example, here the files will be deployed:
- using SFTP (Publisher)
- to the server on 192.168.80.133 (Server)
- to the server location /opt/lianja/cloudserver/tenants/public/ (Directory)
- logged in as root (Username)
- the password (Password) is not specified, but a prompt dialog will be displayed
Note that the Directory location is the root location. Files will be deployed to the sub-directories of this location. The trailing directory separator ('\' or '/') should be included.
Publisher path and Publisher arguments are only required when using a Custom Publisher.
Setup

Click the Quick Deploy toolbutton in the headerbar to open the dialog.
The first step in using Quick Deploy is Setup.
Clicking the Setup button takes you into the Deploy workspace. Here you can select the databases, Apps and Library files that will be included in your deployment.

Check the box next to the databases, Apps and Library files to be deployed.
While in the Deploy workspace, you can change the Deployment Settings to specify an alternative location or additional options as required.
Then switch back to the Pages workspace and reopen the Quick Deploy dialog using the toolbutton in the headerbar.
Note that while this Lianja App Builder session is running your deploy setup will remain active until you change it.
Preview

Clicking Preview will allow you to check the files and destination location of the files to be deployed.
Commit

When you are ready to deploy, click the Commit button and confirm when prompted by clicking Yes.
Then click Close.
Deploy Workspace
As mentioned above, you can go directly to the Deploy workspace rather than use Quick Deploy.
To deploy in the Deploy workspace, there should be no App or database open.

Check the box next to the databases, Apps and Library and MetaTypes files to be deployed.
Note that if your Apps are in a Lianja Project, checking the box next to the Project name will automatically select all files associated with that Project in the Deployment files explorer tree.
While in the Deploy workspace, you can change the Deployment Settings to specify an alternative location or additional options as required.

Clicking the Preview changes headerbar toolbutton will allow you to check the files and destination location of the files to be deployed.

Click the Commit changes headerbar toolbutton when you are ready to deploy and confirm when prompted by clicking Yes.
Deployment Settings
As mentioned above, the deployment settings default to those in the App Settings. These can be changed in the Deploy workspace and additional file permissions specified.

Click New to create a new Deployment Settings profile.
Enter a name for the profile then fill in the settings.
Settings descriptions are listed in the tables below.
Once complete, click Save.
The new settings profile can be selected from the Favorites combobox at any time in the future to override the App Settings defaults.
Server details
| Setting | Description |
|---|---|
| Server | The server IP address or nodename where the App will be deployed, e.g. localhost or myserver.mydomain.com. |
| Username | The optional username to authenticate with the remote server. |
| Password | The optional password to authenticate with the remote server. |
| Private key (.pem file) | The (optional) private key (.pem file) to authenticate with the remote server. |
| Directory | The root lianja directory on the LAN or server where the Apps will be deployed. |
| Owner | The owner to be set for the deployed files, e.g. 'apache'. |
| Group | The group to be set for the deployed files, e.g. 'apache'. |
| Permissions | The permissions to be set for the deployed files, e.g. '766'. |
Publisher details
| Setting | Description |
|---|---|
| Publisher | The way to publish the Apps (Copy | SFTP | Custom). |
| Publisher path | The optional full path of the publisher program, e.g. /usr/bin/rsync. |
| Publisher arguments | The optional arguments to the publisher program, e.g. -avc for rsync. |
System Database

The system database holds the definitions for Users and Roles, Row Level Security and Dynamic Data Masks.
Make sure the system database is included in the deployment.
Deploying Mobile Apps
To deploy PhoneGap mobile Apps for iOS or Android ...
- Deploy data as above ...
- PhoneGap build in Build workspace ...
PhoneGap Build
Select the Build workspace in the App Builder then select the PhoneGap Build Tab and specify the build settings as described. Notice that you can manage existing builds by specifying your PhoneGap Build Account Credentials then clicking the Refresh button. The status of your existing builds will be displayed. The Adobe PhoneGap Build Service limits you to 25 builds. You need to delete older builds or the builds will eventually be rejected. You can delete individual older builds by clicking Delete on the left hand side column of the build information or click the Purge button to delete all your builds.

PhoneGap App Settings
Create some new PhoneGap App settings by clicking New specifying a unique Application ID and then specifying the settings in the tabs as shown below.

The Base URL is important as this will be embedded into your App when you build it. This should be the base URL of your Lianja Cloud Server. If you are testing your App on a mobile device then this will default to the IP address of your development machine e.g. http://192.168.1.5:8001/.
All JavaScript files, images etc. will be embedded into your PhoneGap App. When you build the App Lianja will minify all the JavaScript and CSS for you to keep the PhoneGap App as small as possible.
Further configure your App in the App Preferences and App Plugins tabs.


Click Save when the App Options, App Preferences and App Plugins configuration is complete.
Build
After selecting the PhoneGap Build Service Tab, select the Device Type and the Operating System then click the Build button.
Lianja App Builder will dynamically generate the PhoneGap directory structure needed to build the App and will request a remote build using the Adobe PhoneGap Build service. The PhoneGap Build Log will provide progress messages during the build process so you can see what is going on.
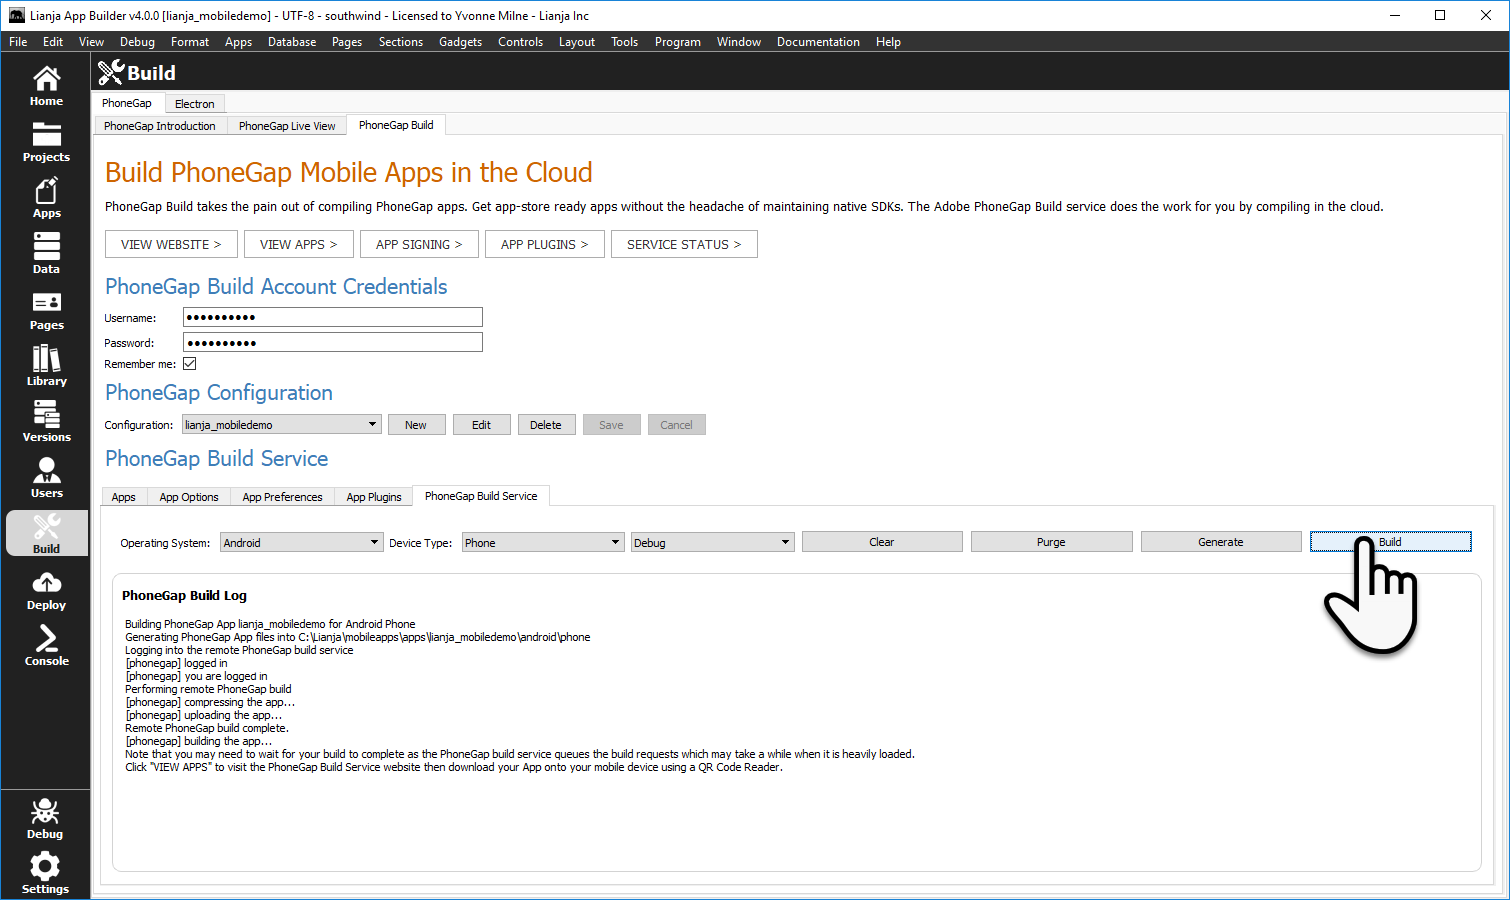
If you get an unexpected error message (e.g. ones that you can't fix by correcting your Account Credentials), please check the PhoneGap Build Troubleshooter for ones we have encountered and their solutions.
Your Apps
If the build is successful (as detailed in the PhoneGap Build log) click the VIEW WEBSITE button and then select Apps. You will need to login with your Adobe PhoneGap Build credentials to do this.
Once logged in, you can also use the PhoneGap workspace VIEW APPS button to go directly to your apps. Click APP SIGNING or APP PLUGINS for more online information and SERVCE STATUS to check the status of the PhoneGap Build Service.


Scan QR-Code
With the Apps page displayed, open the QR-Code Reader App on your mobile device and scan the QR-Code for the App that you have just built. You will be asked if you want to download it, answer yes, then yes again to install it.
Deployment Directories
Lianja Cloud Server
Using the standard installation settings, these are the Lianja Cloud Server default directories for Web/Mobile Apps:
Windows
| Files | Location |
|---|---|
| App | C:\lianja\cloudserver\tenants\public\wwwroot\apps |
| Databases | C:\lianja\cloudserver\tenants\public\data |
| Library | C:\lianja\cloudserver\tenants\public\wwwroot\library |
Linux
| Files | Location |
|---|---|
| App | /opt/lianja/cloudserver/tenants/public/wwwroot/apps |
| Databases | /opt/lianja/cloudserver/tenants/public/data |
| Library | /opt/lianja/cloudserver/tenants/public/wwwroot/library |
Mac
| Files | Location |
|---|---|
| App | /usr/local/lianja/cloudserver/tenants/public/wwwroot/apps |
| Databases | /usr/local/lianja/cloudserver/tenants/public/data |
| Library | /usr/local/lianja/cloudserver/tenants/public/wwwroot/library |
Lianja App Center
Using the standard installation settings, these are the Lianja App Center default directories for Desktop Apps:
Windows
| Files | Location |
|---|---|
| App | C:\lianja\cloudserver\tenants\public\apps |
| Databases | C:\lianja\cloudserver\tenants\public\data |
| Library | C:\lianja\cloudserver\tenants\public\library |
Linux
| Files | Location |
|---|---|
| App | /opt/lianja/cloudserver/tenants/public/apps |
| Databases | /opt/lianja/cloudserver/tenants/public/data |
| Library | /opt/lianja/cloudserver/tenants/public/library |
Mac
| Files | Location |
|---|---|
| App | /usr/local/lianja/cloudserver/tenants/public/apps |
| Databases | /usr/local/lianja/cloudserver/tenants/public/data |
| Library | /usr/local/lianja/cloudserver/tenants/public/library |