Difference between revisions of "Install SQL Server on Linux"
Yvonne.milne (Talk | contribs) |
Yvonne.milne (Talk | contribs) (→Lianja ODBC Driver) |
||
| (5 intermediate revisions by 2 users not shown) | |||
| Line 1: | Line 1: | ||
| − | + | ==See Also== | |
| + | * [http://www.lianja.com/component/rsfiles/files?folder=Linux Downloads for Linux] | ||
| + | * [[:Category:License Management|License Management]] | ||
| + | * [[Lianja Server Manager on Linux]] | ||
| + | ==Before you start...== | ||
| + | Do not run the Lianja SQL Server installer if you have already installed the Lianja Cloud Server. The Lianja Cloud Server installer includes the Lianja Cloud Server, the Lianja SQL Server and the Lianja ODBC Driver. | ||
| − | + | The Lianja SQL Server includes the Lianja SQL Server and the Lianja ODBC Driver. | |
| − | + | ===RHEL / Centos 8.x=== | |
| + | The required '''libnsl''' package is no longer provided in the OS glibc package, so should be installed separately. | ||
| + | |||
| + | <pre>$ sudo yum install libnsl</pre> | ||
==Installation== | ==Installation== | ||
| − | * Make sure root has execute permission on the downloaded file. | + | * Make sure root has execute permission on the downloaded file. |
| − | * As root or using sudo, run the installer. | + | |
| − | + | Open up a Terminal window. (e.g. on Ubuntu right click on the desktop and select 'Open Terminal'). | |
| − | [[ | + | |
| − | + | Since 5.1 the distro is a compressed tar file. | |
| − | + | ||
| − | + | <pre> | |
| − | + | $ cd | |
| − | + | $ cd Downloads | |
| − | + | $ tar xvf LianjaSQLServer-X.X.X-linux-x64-installer.tar.gz | |
| − | + | $ chmod +x LianjaSQLServer-X.X.X-linux-x64-installer.bin | |
| − | + | </pre> | |
| − | + | ||
| − | + | Prior to 5.1 it was not a compressed tar file. | |
| − | [[ | + | |
| − | + | <pre> | |
| − | + | $ cd | |
| − | + | $ cd Downloads | |
| − | [[ | + | $ chmod +x LianjaSQLServer-X.X.X-linux-x64-installer.bin |
| − | + | </pre> | |
| − | + | ||
| − | [[ | + | * As root or using sudo, run the installer. |
| − | + | <pre>$ sudo ./LianjaSQLServer-X.X.X-linux-x64-installer.bin</pre> | |
| − | + | ||
| − | [[ | + | [[{{ns:file}}:l_ss_install1.png|600px|thumb|left|link={{filepath:l_ss_install1.png}}|Installer: Language Selection]] |
| + | |||
| + | |||
| + | |||
| + | |||
| + | Select the language for installation, then click '''OK''': | ||
| + | <br clear=all> | ||
| + | |||
| + | [[{{ns:file}}:l_ss_install2.png|600px|thumb|left|link={{filepath:l_ss_install2.png}}|Installer: Welcome]] | ||
| + | |||
| + | |||
| + | |||
| + | |||
| + | The welcome page will be displayed. | ||
| + | |||
| + | Click '''Forward''': | ||
| + | <br clear=all> | ||
| + | |||
| + | [[{{ns:file}}:l_ss_install3.png|600px|thumb|left|link={{filepath:l_ss_install3.png}}|Installer: License]] | ||
| + | |||
| + | |||
| + | |||
| + | |||
| + | Read the License Agreement using the scrollbar to display the full text | ||
| + | |||
| + | |||
| + | Click a radio button to accept or reject the License Agreement, then click '''Forward''' | ||
| + | |||
| + | If you select '''I accept the agreement''', the installation will continue. | ||
| + | |||
| + | If you select '''I do not accept the agreement''', you will be prompted to abort the installation. | ||
| + | |||
| + | If you click '''Yes''' the installation will stop, if you click '''No''' you will be returned to the License Agreement. | ||
| + | |||
| + | <br clear=all> | ||
| + | |||
| + | [[{{ns:file}}:l_ss_install4.png|600px|thumb|left|link={{filepath:l_ss_install4.png}}|Installer: Components]] | ||
| + | |||
| + | |||
| + | |||
| + | |||
| + | After accepting the License Agreement, the installation will continue | ||
| + | |||
| + | Make sure 'Lianja SQL Server' is checked, then click '''Forward'''. | ||
| + | |||
| + | <br clear=all> | ||
| + | |||
| + | [[{{ns:file}}:l_ss_install5.png|600px|thumb|left|link={{filepath:l_ss_install5.png}}|Installer: Ready to Install]] | ||
| + | |||
| + | |||
| + | |||
| + | |||
| + | Click '''Forward''' to begin the installation | ||
| + | |||
| + | If you do not want the installation to begin, click '''Cancel''' | ||
| + | |||
| + | <br clear=all> | ||
| + | |||
| + | [[{{ns:file}}:l_ss_install6.png|600px|thumb|left|link={{filepath:l_ss_install6.png}}|Installer: Finished]] | ||
| + | |||
| + | |||
| + | |||
| + | Once the installer has finished, uncheck the box if you do not want to view the Readme File, then click '''Finish'''. | ||
| + | |||
| + | <br clear=all> | ||
| + | |||
| + | [[{{ns:file}}:l_ss_install7.png|600px|thumb|left|link={{filepath:l_ss_install7.png}}|Installer: Readme]] | ||
| + | |||
| + | |||
| + | |||
| + | Click '''OK''' to exit the Readme. | ||
| + | <br clear=all> | ||
| + | |||
| + | ==Managing the Lianja Server== | ||
| + | [[{{ns:file}}:l_ss_install8.png|600px|thumb|left|link={{filepath:l_ss_install8.png}}|Managing the Lianja Server]] | ||
| + | |||
| + | |||
| + | |||
| + | |||
| + | The '''lianja_admin''' command is used to manage the Lianja Server and must be run as root or using sudo. | ||
| + | |||
| + | To check that the Lianja Server is running: | ||
| + | <pre>$ sudo lianja-admin status</pre> | ||
| + | |||
| + | <br clear=all> | ||
| + | |||
| + | [[{{ns:file}}:l_ss_install9.png|600px|thumb|left|link={{filepath:l_ss_install9.png}}|Managing the Lianja Server]] | ||
| + | |||
| + | |||
| + | |||
| + | Further lianja-admin options are: | ||
| + | <pre>$ sudo lianja-admin start | ||
| + | $ sudo lianja-admin stop | ||
| + | $ sudo lianja-admin restart</pre> | ||
| + | |||
| + | <br clear=all> | ||
| + | |||
| + | For more information see [[Lianja Server Manager on Linux]]. | ||
| + | |||
| + | ==Lianja ODBC Driver== | ||
| + | The Lianja ODBC Driver requires the unixODBC package. To install unixODBC: | ||
| + | |||
| + | Ubuntu | ||
| + | |||
| + | <pre>$ sudo apt-get install unixodbc</pre> | ||
| + | |||
| + | RHEL | ||
| + | |||
| + | <pre>$ sudo yum install unixODBC</pre> | ||
| + | |||
| + | Now init the ODBC definitions for Lianja. This will define the Lianja ODBC driver in /etc/odbcinst.ini and the lianja_southwind DSN in /etc/odbc.ini. | ||
| + | |||
| + | <pre>$ sudo cd /opt/lianja/server/dist | ||
| + | $ sudo ./postinstall.sh /opt/lianja/server odbc</pre> | ||
| + | |||
| + | For information on setting up ODBC data sources, see [http://www.unixodbc.org/odbcinst.html unixODBC without the GUI]. | ||
| − | |||
| − | |||
[[Category:Installation| ]] | [[Category:Installation| ]] | ||
[[Category:Installation on Linux| Lianja SQL Server]] | [[Category:Installation on Linux| Lianja SQL Server]] | ||
[[Category:Lianja SQL Server]] | [[Category:Lianja SQL Server]] | ||
Latest revision as of 13:07, 12 February 2021
Contents
See Also
Before you start...
Do not run the Lianja SQL Server installer if you have already installed the Lianja Cloud Server. The Lianja Cloud Server installer includes the Lianja Cloud Server, the Lianja SQL Server and the Lianja ODBC Driver.
The Lianja SQL Server includes the Lianja SQL Server and the Lianja ODBC Driver.
RHEL / Centos 8.x
The required libnsl package is no longer provided in the OS glibc package, so should be installed separately.
$ sudo yum install libnsl
Installation
- Make sure root has execute permission on the downloaded file.
Open up a Terminal window. (e.g. on Ubuntu right click on the desktop and select 'Open Terminal').
Since 5.1 the distro is a compressed tar file.
$ cd
$ cd Downloads
$ tar xvf LianjaSQLServer-X.X.X-linux-x64-installer.tar.gz
$ chmod +x LianjaSQLServer-X.X.X-linux-x64-installer.bin
Prior to 5.1 it was not a compressed tar file.
$ cd
$ cd Downloads
$ chmod +x LianjaSQLServer-X.X.X-linux-x64-installer.bin
- As root or using sudo, run the installer.
$ sudo ./LianjaSQLServer-X.X.X-linux-x64-installer.bin

Select the language for installation, then click OK:

The welcome page will be displayed.
Click Forward:

Read the License Agreement using the scrollbar to display the full text
Click a radio button to accept or reject the License Agreement, then click Forward
If you select I accept the agreement, the installation will continue.
If you select I do not accept the agreement, you will be prompted to abort the installation.
If you click Yes the installation will stop, if you click No you will be returned to the License Agreement.

After accepting the License Agreement, the installation will continue
Make sure 'Lianja SQL Server' is checked, then click Forward.

Click Forward to begin the installation
If you do not want the installation to begin, click Cancel

Once the installer has finished, uncheck the box if you do not want to view the Readme File, then click Finish.

Click OK to exit the Readme.
Managing the Lianja Server
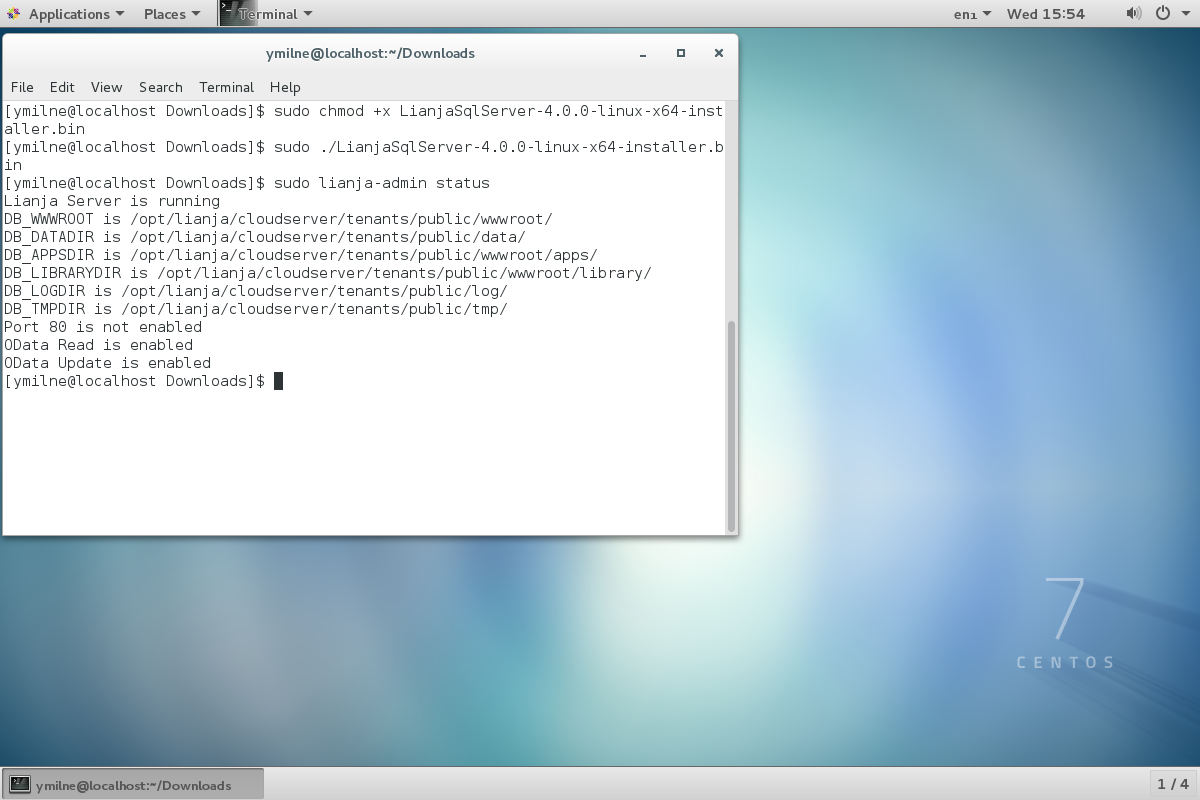
The lianja_admin command is used to manage the Lianja Server and must be run as root or using sudo.
To check that the Lianja Server is running:
$ sudo lianja-admin status
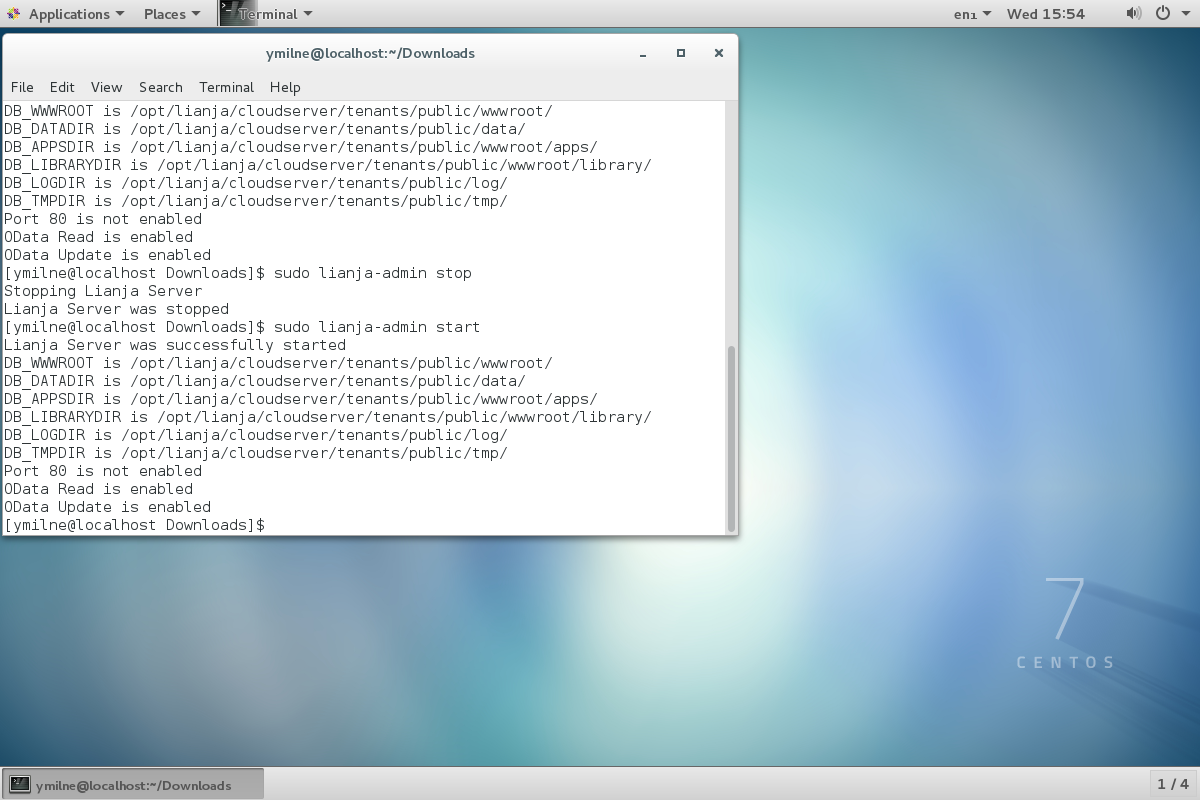
Further lianja-admin options are:
$ sudo lianja-admin start
$ sudo lianja-admin stop
$ sudo lianja-admin restart
For more information see Lianja Server Manager on Linux.
Lianja ODBC Driver
The Lianja ODBC Driver requires the unixODBC package. To install unixODBC:
Ubuntu
$ sudo apt-get install unixodbc
RHEL
$ sudo yum install unixODBC
Now init the ODBC definitions for Lianja. This will define the Lianja ODBC driver in /etc/odbcinst.ini and the lianja_southwind DSN in /etc/odbc.ini.
$ sudo cd /opt/lianja/server/dist
$ sudo ./postinstall.sh /opt/lianja/server odbc
For information on setting up ODBC data sources, see unixODBC without the GUI.