Getting Started Part 1
This article provides an overall introduction to Lianja and the Lianja App Builder. The target audience is for beginners who know nothing about Lianja at all and want to gain an understanding of the Lianja Application Platform and how to develop Apps using the Lianja App Builder.
Contents
- 1 See Also
- 2 Lianja App Builder
- 3 Creating your first Lianja App
- 3.1 Create an App
- 3.2 Lianja Apps are made up of pages
- 3.3 Adding form sections to pages
- 3.4 Adding grid sections to pages
- 3.5 Populating a grid with data
- 3.6 Drag and drop grid sections
- 3.7 Relating sections together
- 3.8 Visual Relationship Builder
- 3.9 Customizing page attributes
- 3.10 Customizing a section
- 3.11 Ready to run
- 3.12 Desktop App View
- 3.13 Desktop App View and Development View
See Also
Lianja App Builder

The Lianja App Builder is contained inside a single window consisting of several workspace panels that can be activated by clicking on the selection tabs in the Modebar.
You start in the App Center in the Home tab. Here you have one-click access to your published Apps, online documentation and key App development actions.

To load the lianjademo sample App, click on its tile (Lianja Demo) in the App Center. The Pages workspace is automatically selected and the lianjademo App loaded into the Page Builder.
Page Builder
The focal point for building desktop and web Apps in Lianja is the visual design and development workspace panel known as the Page Builder and this is what we are going to concentrate on in this tutorial.
Using the Page Builder you can visually build a data-centric app that can combine data and other interesting content from a wide variety of data sources; databases, web services using REST, and other custom data sources.
If you are a non-programmer with a good knowledge of your business domain you will most likely be able to build an app that requires no programming to be done at all.
How is this possible you may ask? You will find out during the course of these tutorials how Lianja takes a radically different view of the application development process compared to other database and web development tools.

As mentioned previously, using the Page Builder you visually build a data-centric app.
In Lianja, apps are made up of a variety of visual elements. Using the Page Builder, you arrange these visual elements into an app. The base visual element is a Page. Pages are made up of Sections.

There are various types of pre-built commonly used sections to help speed up your development: Form, Grid, Webview, Image Strip, Canvas and Tabview. Form sections are made up of Fields and Gadgets.
For professional developers, you can also develop Custom sections and Custom gadgets in Recital, Visual FoxPro, JavaScript, PHP or Python and reuse them across many apps that you build.
To make it easier to build apps that will run native on the desktop and also in a web browser, Lianja has a feature complete Application Framework. This application framework is an implementation of the Visual FoxPro 9 application framework. It has been extensively extended to provide more modern and easier to use components that are cross-platform, language and UI independent.
You can build custom sections and gadgets using the Lianja Application Framework in Recital, Visual FoxPro, JavaScript, PHP and Python. For complete details of the Lianja Application Framework see the documentation in the Home Workspace.
Creating your first Lianja App
The easiest way to show you the power and simplicity of Lianja is to to build an App!
Go back to the App Center in the Home Workspace Panel by clicking on the Home Selection Tab located in the Modebar on the left of the main window or the Home toolbutton in the Headerbar. You can switch back and forth between the different workspace panels at any time.
Create an App

Now click the Create an App Tile.
You can also create Apps from the Apps Workspace Panel by clicking on the + button in the Actionbar of the Apps Panel.

The Apps Workspace will be automatically selected and the Lianja App Wizard displayed.
Click 'Next' to continue.

Enter a name for your App.
You can also select the type or types of client your App will run on. The types can also be modified in the App Settings later on if required.
Leave all types selected and click 'Next' to continue.

Select your preferred Scripting Language. For Web and Mobile Apps, select 'JavaScript'.
This is the App's default Scripting Language, it does not mean that all scripts in the App need to be written in that language or that your App need include any scripting at all.
Select 'JavaScript' and click 'Next' to continue.

Optionally choose a database to use.
The 'southwind' database is a sample database included in the distribution and used extensively in the tutorials and documentation.
Select 'southwind' and click 'Next' to continue.

The final Wizard page displays a summary of your App settings.
Click 'Finish' to continue.
Lianja Apps are made up of pages
Now the Pages workspace panel will be displayed and a blank page 'page1' will be created.
Pages are the base visual elements of an App and are, in turn, made up of Sections.
The App Inspector will have the 'Pages Files' tab selected and the Tables explorer will list the tables from the southwind database.
If you can't see the tables, switch to the Databases explorer and double-click on 'southwind'.
Adding form sections to pages

Click the customers table and drag it onto the empty Page to create a Form section and populate it with the columns from the table.
Don't worry about the order in which the fields are added to the form section as these can be reordered or removed completely later. Let's just get a default form laid out first.
You can also add a Form Section from the Form Tools and drag the table or individual fields into it to populate it. Let's see how that's done with a Grid Section.
Adding grid sections to pages

Click on the Sections button in the Form Tools. Select Grid, and an empty grid section will be added to the page.
Populating a grid with data
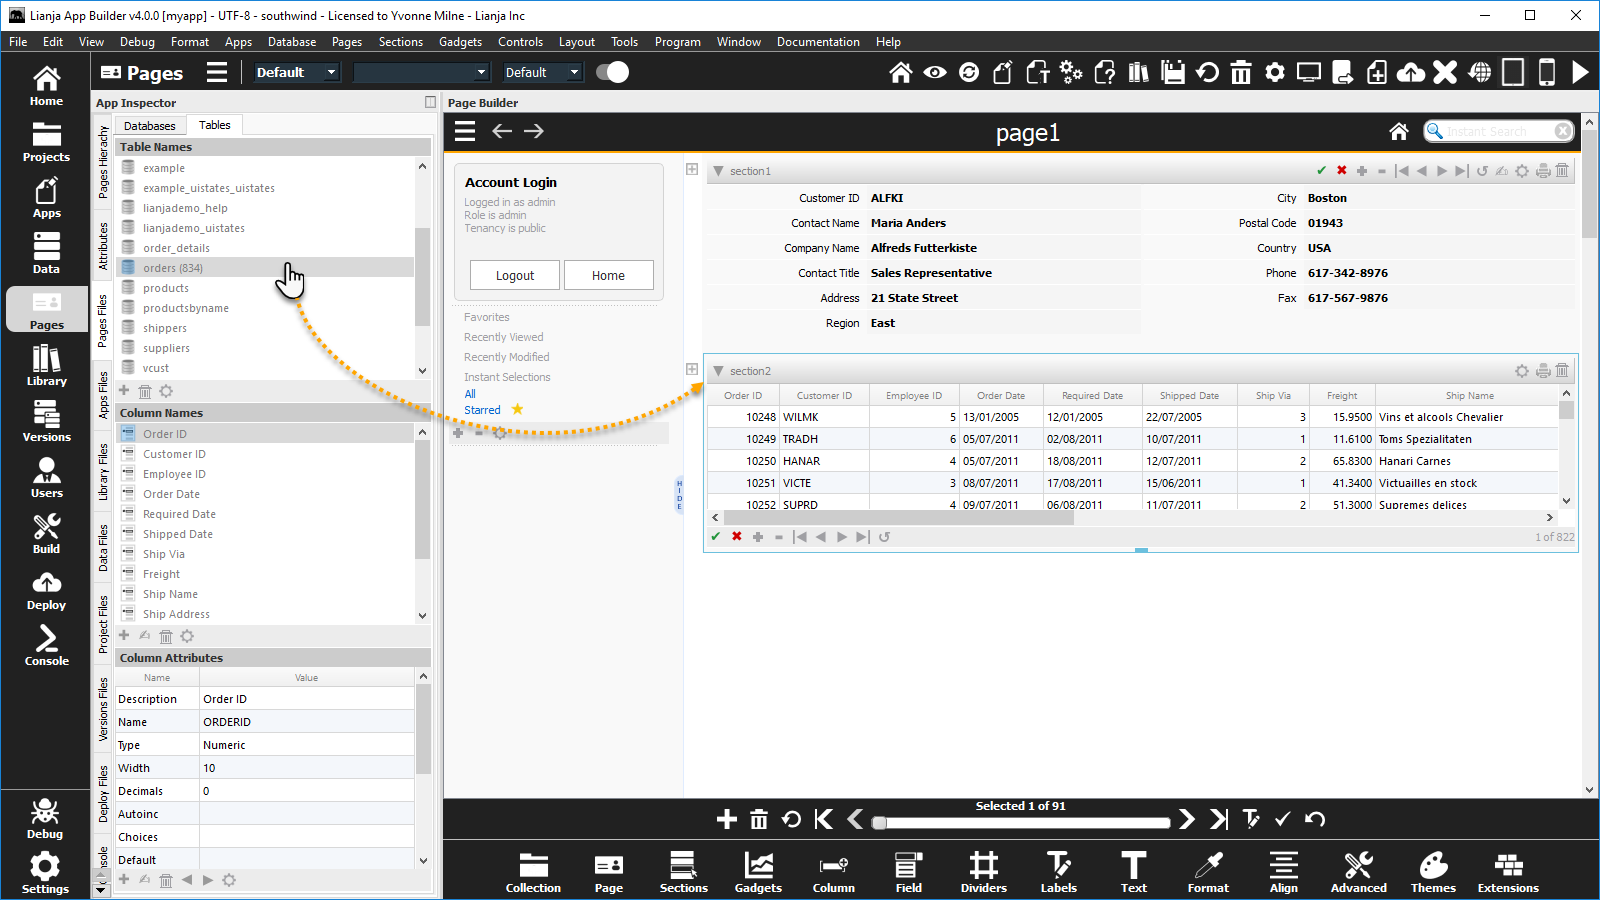
Click to select the orders table in the Tables panel and drag it into the grid section you have just created. The grid will be populated with the columns from the orders table.
The grid columns can be moved around by dragging and dropping the grid column headers.
Individual columns can be customized in the column attributes in the App Inspector.
Right-clicking on the column header allows you to insert or remove a column or reset hidden columns.
Note also that the data you are working with is all live so you are seeing exactly how the app will look at runtime.
Note: from Lianja v4.2 'Move Column Left' and 'Move Column Right' are also available from the context menu when you right-click on a column header.

Drag and drop grid sections

Grid Sections can also be created using drag and drop. Just press the Shift key as you drag the order_details table on to an empty part of the Page and a new Grid Section will be added and populated.
Relating sections together

Now that you have a basic page containing three pre-built sections you can relate the customer in the customers form to their orders in the orders grid and then each order to its order details.
In Lianja this is simple: each Section can be related visually to other sections on the page using the Relationship Builder.
Click on the + sign in the Relationship Builder panel next to the parent section. Then click on the section header for the child section that you want to relate to.
Note for advanced developers. Relational joins made easy and super-fast. If the primary and foreign keys chosen by Lianja are not what you want, they can be specified manually by changing them in the section attributes.
Visual Relationship Builder

You will now see that the Relationship Builder displays a relationship diagram between the sections.
Each section can relate to one or more child sections, which can be of any type: Form, Grid, Webview, Image strip, Tabview, Attachments or Custom.
Add further relationships between sections by clicking the + next to the parent then clicking the child section header.
If you want to make a change, you can disconnect a relationship by clicking on the - sign.
Visually relate as many sections as you want. One-to-one or one-to-many relationships fully supported. No programming required.
Customizing page attributes

To customize the appearance of a page, you set its attributes.
Click on the Page's header and the App Inspector will switch to the 'Attributes' tab.
Inside the 'Attributes' tab there are internal tabs for Page, Section, Formitem and GridColumn.

Double-clicking on the vertical 'Attributes' tab caption opens the Attributes tab in a floating window.
To learn more about using the App Inspector, see the video here.

If the App Inspector is closed, double-click in the Page Headerbar or click the Cog toolbutton to access the Page Attributes.
For sections and gadgets, double click on their header. In the case of Form Fields, dividers, and column separators, double-click on the caption.

The Attributes dialog for the selected UI component will slide in from the right hand side of the main window.

Set the Title and the Caption for the Page.
Customizing a section

To customize the appearance of the sections, click on the Customers Section and it will be selected in the Attributes tab of the App Inspector.
(If the App Inspector is closed, double-click the Section header and the Section Attributes dialog will slide in.)
Change the Section Caption to Customers, then repeat the same process for the orders section and the order_details section.
Ready to run

Now the page should look like this.
Desktop App View

To view the app in runtime view, just click the Desktop App View icon in the Headerbar.
Desktop App View and Development View

Now you see the App running! It's as simple as that.
You can move between records using the navigation controls in the Actionbar.
To switch back into Development view just click the icon in the Headerbar.